Upcountry Hawaii is often overflowing with avocados in the Winter. They have been sliced, scooped, mashed, and now roasted. I often clean my kitchen cabinets this time of year, and one of the items that I discovered was an unopened bag of Japanese style bread crumbs, known as Panko. With the winds, and heavy rains bringing down even more avocados, I roasted warm dish was in order. I selected a perfectly ripe one, cut off the bruised bit where it fell to the ground, and sliced it into planks. Next, I beat one egg, and dipped the avocado in it before dredging through the breadcrumbs. I lined them up in a baking dish, and sprinkled them with seasoned seaweed flakes. I set the oven to 450 and let them turn golden (about 15 min.) For a dipping sauce, I combined chili garlic paste, sesame oil, tamari (or soy) sauce, and two spoonfuls of my lemongrass tea (optional.) The result was a lovely warm appetizer with a Pacific twist. I ate it as a meal, but it could be served as a side as well. Simple, healthy, and using our produce abundance in a new, tasty way. Aloha.
Category Archives: recipes

Too Much Pipinola?(Chayote)
I learned to love chayote, an edible gourd that is known as pipinola here in Hawaii. You may recall that I learned to ferment with it, cook with it, and even how to breed it for the characteristics that chefs find desirable. Here is a look at the start of one of my 10 minute meals. When I was getting ready to travel, pipinola were ripening, so I took the time to shred the fruits in a food processor, pack into 1qt freezer bags, then squeeze out the air from the bag. The result were a nice stack of pipinola blocks. Today, as you see in the image, I took one of those frozen blocks, dropped it into my slow cooker, and added tomato, onion, chili pepper, taco seasoning, pumpkin and more to the mix. I will leave it to cook all afternoon, and when I return from the farm, dinner will be waiting. This same technique would work for chili. The pipinola takes on the flavor of the taco spices, and acts as a great filler. It is a great way to add vegetables to your cooking, while also making use of the fruits at your doorstep. I have plans on topping the lot with refried beans and cheese before stuffing the mix into tortillas.
I just returned home to find my neighbor telling me that he can smell my cooking down the street! It is a homemade smell that we all want to come home to. I just finished it by thickening it with a can of refried black beans, and some of yesterday’s rice…and I realized that this would make a great dip too! I will be happy to eat this in many different ways in the days ahead. Taco salad? Maybe my kraut tacos…with scrambled eggs in a breakfast burrito. See the bottom photo to see the transformation it made while I was at the farm trellising more pipinola vines. Now it is time to top with cheese and test it out.


Farm Fermentations: squash, beet and seaweed
I began fermenting back in July as a means of finding even more uses for the vegetables that I grow. In the past six months, I have continued to explore ways that fermentation can be good for me, my farm, other farmers, and the entire community. It continues to be a journey of discovering new things with each new ferment.
This past week I decided to continue to work with other farmers and their abundance. It turns out that my quarts of fermented produce have become a wonderful item to barter with. Squash is the core of all I do, so squash is also the core foundation of my fermentation. I have experimented with two varieties of winter squash, one variety of summer squash from my fellow farmer Lark, and pipinola. Pipinola is what I consider a cousin of squash. We have a unique name for it here in Hawaii, but it is more commonly known as chayote.
I have previously sung the wonders of pipinola on my webpage, but I would like to add that it is a good source of vitamin C. Raw chayote it crunchy, and crisp, which are two great things for fermentation. It is also quite neutral in flavor and color, making it my fill in for cabbage. It also releases water quite easily when salt is added.

I began my pipinola growing with green skinned heavily wrinkled fruits. I found a variation that I liked which was a smoother, softer skinned fruit. I selected these traits and gradually replanted the fruits that displayed this smooth skin. Like any variation there are upsides and downsides. The smoother, softer skin, makes the skin easily used in the kitchen instead of the tougher skinned ones. The downside, is that they are much more susceptible to damage through bruising and nicks. Pipinola/chayote is grown by replanting the fruits, and the one large seed within will germinate with a dynamic vine.
One you have your fermentation base vegetables, it is great to explore how new combinations can change it all up. So this week, I investigated how other farm goods can be brought into the mix. I have always loved root vegetables which are not easy to grow where I am farming. Beets have come into season again here in Hawaii, so it was time to revisit the Bonk family and get my hands on some beets. Marlene was happy to take a quart of pumpkin/carrot/pipinola kraut, while I was excited to fill my bag with beets.
With each new vegetable, I create a series of ferments that are linked by that one new flavor. If we were talking fashion design, my ferments would be a collection, so I will refer to them as such. In the beet collection, I decided to marry the sweet with the heat of ghost peppers in another, as featured above, I threw it all in.
Each of us will like different combinations of vegetables, and as is the case with fermentation, you may like some fermented vegetables, that you do not like unfermented. Fermentation transforms, melds, marries flavors into a complex profile. So with the new addition of beets, we can look at how they shape the ferment in terms of nutrition, flavor, and color. There is also the need to consider what is the limit of how much beet we can handle? When is it enough? Experiment so to know the limitations of your ferments. I love seaweed, known here as limu, but there is a point where enough is enough. To much limu can make the ferment very salty, and very intense in minerals. It can pack a punch and “kinda levels” those not used to it. I feel like beet could go the same route, in being an overpowering vegetable, where you need to understand how to use it as an accent, in a combination of flavors, and as a main flavor. As is the story of fermentation, time will tell. Longer fermentation time may make it mellow…or not.

Above, locally sourced Ogo seaweed is busy making my ferments both intense and complex.
Repurposing found objects is also a great way to begin in fermenting. I chose to repurpose a 4 qt crock pot crock and found a lid that would work with it. Most of my ferments are done in one quart jars, but I decided to try a larger quantity of the “kitchen sink” ferment. Quart jars were used for smaller volume experiments.
I’ll be keeping you posted on how the new farm ferment collection turns out, but until then, think in terms of abundance in your garden, your cellar, your farmers market, and region. Abundance is a luxury as long as you do not allow it to overwhelm you. Too much of a good thing can be stressful, and putting up a bushel of vegetables on your own, is quite a task. I can honestly tell you that it does get easier to work your way through a volume of produce. I think starting with what would roughly fit in a grocery bag is a good place to start. So give it a try…and good luck!

Tropical Raw Energy Bars With Pumpkin Seeds
I am a chronic meal skipper, so at the start of every new year, my promises to myself are always about food. I try to challenge myself to prepare ahead of time, and then have healthy grab and go items. Eating homegrown is so satisfying, and it can be an important way to retrain yourself into new ways of eating things from your garden. But even knowing that, prepping takes time. So I have created strategies to have healthy options at the ready.
One of my success stories is a no bake bar that is comprised of raw foods. This recipe uses two farm ingredients, banana and pumpkin seeds. I am drying macadamia nuts right now, and in the future, those would make a lovely addition.
I use a mix of ingredients to combine into a snack bar full of energy providing nutrients. In general terms, the additions are of two main categories: ingredients that will make things stick, and ingredients that need to be stuck together. Prep time under 10 minutes plus refrigeration.

“sticky ingredients” can be:
coconut milk, almond milk, nut or seed butters, ripe banana
“things to stick ingredients” can be:
Oat bran, ground flax seed (these two or similar ones will create the body of the bar) dairy free or regular chocolate chips, seeds like chia, hemp, sunflower kernels, pumpkin seeds, coconut flakes…
I then use carob or cocoa powder to flavor the lot.
Here is roughly my process:
Every time is different, but today, I put some pumpkin seeds through the grinder (or if using the food processor, I put them in whole), add in some sunflower kernels, chia/flax/hemp seeds, some coconut flakes (the big ones) some nuts, dairy free or regular chocolate chips, coconut milk, granola, almond milk, carob powder or cocoa powder. Added flax seed bran, and oat bran, and added bran until it was a good consistency to press into a pan.
I just put in what I have. I add only enough of the milks to smoosh it all together. I think the addition of a glob of almond butter and ripe smooshed banana makes the bars rich and satisfying. I then just press it into a square pan, and top with more coconut, pressing the coconut into the top of the bars.
I have always mixed this in a large bowl, but today I made it in a food processor since I had it out and ready to go. I find that it is easy to use the back of a large spoon to press it all into the pan before topping with more coconut.

I then I cover the pan, and pop it into the fridge, and I will cut them into squares after a couple hours. I keep them in the fridge, and then put a couple in a travel container to carry with me. I keep key ingredients on hand so this takes just a few minutes. It could be served as a healthy desert too!
I should be making these every week….now there is a New Year’s resolution I can stick with!

Lima Bean and Pumpkin Chili
Maybe it needs a better name, but for now, it will have to do. As I savor the last bite, I am filled and satisfied with this now much more nutritious dish. Holiday visitors passed through the kitchen as I was making the chili, and it seemed to be an unlikely recipe to most. My invented recipe intrigued an eight year old who dreams of being on a “kid chef” show on the Food Network. He watched me like a hawk. The recipe is made in a slow cooker, and can be adapted to all tastes.
This time of year, I often collect a nice amount of the heirloom Christmas lima bean. I am frequently pressing these beans into the hands of school kids in hopes that they plant them here in Hawaii. They should be grown in everyone’s home garden, school gardens, and on fences, banana trees, bamboo…you get the idea. They are perfect for Hawaii’s long, come and go seasons. It creates a pretty vine, and the bees love the delicate bloom. I’ve sung it’s praises before, and I am at it again. Plus the bean is big and very flavorful.

Above is an image that shows how they catch the morning light in the garden. In the photo, they are covering an unsightly windbreak that I made two years ago out of bamboo threaded through shipping pallets that were placed on their side. It has held up, and become a beautiful area that is also effective against the wind tunnel effect. I bought the first lot from Baker Creek Heirloom Seeds three years ago, and since then, I have supplied half of the state of Hawaii with them, and also included them in many special meals. It was the best $2.50 I have ever spent in the garden!
But back to the chili. Lima beans make a lovely chili bean, especially these lovely burgundy speckled ones, and the spice of homegrown chili peppers mixed with sweet pumpkins is a wonderful, and thrifty match for my eat what you grow style.
So the concept is the take away here. Here is what I did: I picked, shucked and rinsed the lima beans, harvested a few chili peppers and selected a nice aged pumpkin. I soaked the beans for a couple hours, then decided just to cook them on low overnight in the slow cooker. I could have added a wedge of onion to the water that covered the beans, but I forgot. By morning, the home cooking filled my tiny abode. I had 1/4 of the crock pot filled with dried beans and then filled the entire crock with water.
In the morning, I drained the beans, saving the cooking liquid on the side. I did this by simply setting a colander inside a large bowl. I returned the beans to the 4 qt slow cooker, and added 1/2 a chopped onion, 2 packets of chili seasoning, 1.5 lbs of hamburger, one can of tomatoes, and a can of tomato paste, plus three cloves of garlic. Then I chopped about 1.5 pounds of pumpkin, salt and pepper. I also added about 3 cups of the bean cooking broth back into the cooker. Normally, I would add my fresh chili peppers, but this one was made with little kids in mind.
When I make this again for myself, I am going to make a meatless version. The lima beans and pumpkin make a satisfying chili, and the meat just isn’t necessary. The beans were already cooked, so it was a matter of waiting for the pumpkin to cook. This gave me plenty of time to shuck more beans for later cooking and planting, as well as give me some time to turn the home garden upside down section by section, in my December garden overhaul.
By 4 in the afternoon, I couldn’t wait any longer, and snuck a small sample bowl…and then another. I was waiting for the pumpkin to be tender. By this time, I was hungry, and this really hit the spot. I could have easily added more of the bean broth to thin it out a bit. I added some more salt at the end of the cooking. I smeared it with some sour cream and piled it on top of basmati brown rice. There were zero complaints about either the limas or the pumpkin.

The Pumpkin Toffee Cheesecake Trials
As a pumpkin grower, and a great lover of food, many expect me to make lots and lots of pumpkin pie and soup, but three years on, and I have yet to make either. I cook with pumpkin every single week of the year, but I have yet to make some of the most traditional preparations. I make all kinds of savory dishes, and once an a while something sweet. So it was at Thanksgiving three years ago that I first made a Pumpkin Toffee Cheesecake. This year, I returned to that beloved, yet rarely made delight.

It was really a treat, and I cannot explain why it has taken me so long to return to it. I am making up for lost time though, with four cheesecakes having been made in two weeks time. I do realize that not everyone likes either pumpkin pie or cheesecake, so combining them may not be everyone’s choice. I was so pleasantly surprised that I encourage you to give it a try. I have toned down the sugar, and upped the pumpkin to suit my taste.
First off, I am not a big dessert person. I would always take a second helping of the main course over dessert, but during the holiday season, it seems to be my time for desserts. I love to share them with one and all. I have combed through dozens of recipes online and each time I look, they seem more and more glamorous. They look absolutely wonderful with caramel sauce zigzagging back and forth, but I have never done that. It is a sugar issue for me. Here is a caramel topped one. that looks very special for any event where it will be on display.
I stuck with a rather modest “everyday” cheesecake. The first year, I mixed toffee pieces throughout the cheesecake, and this year, I put them on top.
Here is how I adapted the online recipes:
I stuck with a pretty simple cheesecake preparation that began with roasting a pan of chopped squash without any water, so to dry out the pumpkin a bit. Then I added the lot of baked pumpkin pieces to the food processor to puree. I got the oven ready at 350. I used pre-made graham cracker or shortbread crusts. Pre-made crusts often make sense here in Hawaii, where the cost of the shortbreads is much higher than the crusts. I add in the ingredients to the food processor, and let each one get mixed in well. I watched many chefs walk away and leave the food processor churning away, so I did the same, cutting the work time down considerably. This year, I also used evaporated milk instead of half and half or cream.
With it all churning away, I pulled two small cookie sheets so that each cheesecake would have space in case it needed to bubble over (which none of them did) but it also makes it easier to handle the lot. I turned the oven off after 45 minutes, and let them continue to set for another 20 minutes. I made a simple icing out of sour cream, some sugar and vanilla, drastically reducing the amount of sugar. I figured there would be enough sugar in the toffee pieces that I put on top. The icing was a nice finish, but it isn’t necessary. I enjoy the simplicity of one made without the additional cream.
With the food processor filled to the very top, it allowed me to fill two crusts, giving them a little shake to even the cheesecake batter in the pans. I needed to rush one of them, so I put it in the freezer to set prior to dinner. It all worked quite well. This is a forgiving dish, with many unique variations to try. I hope to keep experimenting with this. A farmer friend of recommended his goat cheese, which I will try at a later date. I also thought about a macadamia nut crust just for a bit more texture.
So go ahead and see what you come up with. May you be inspired!

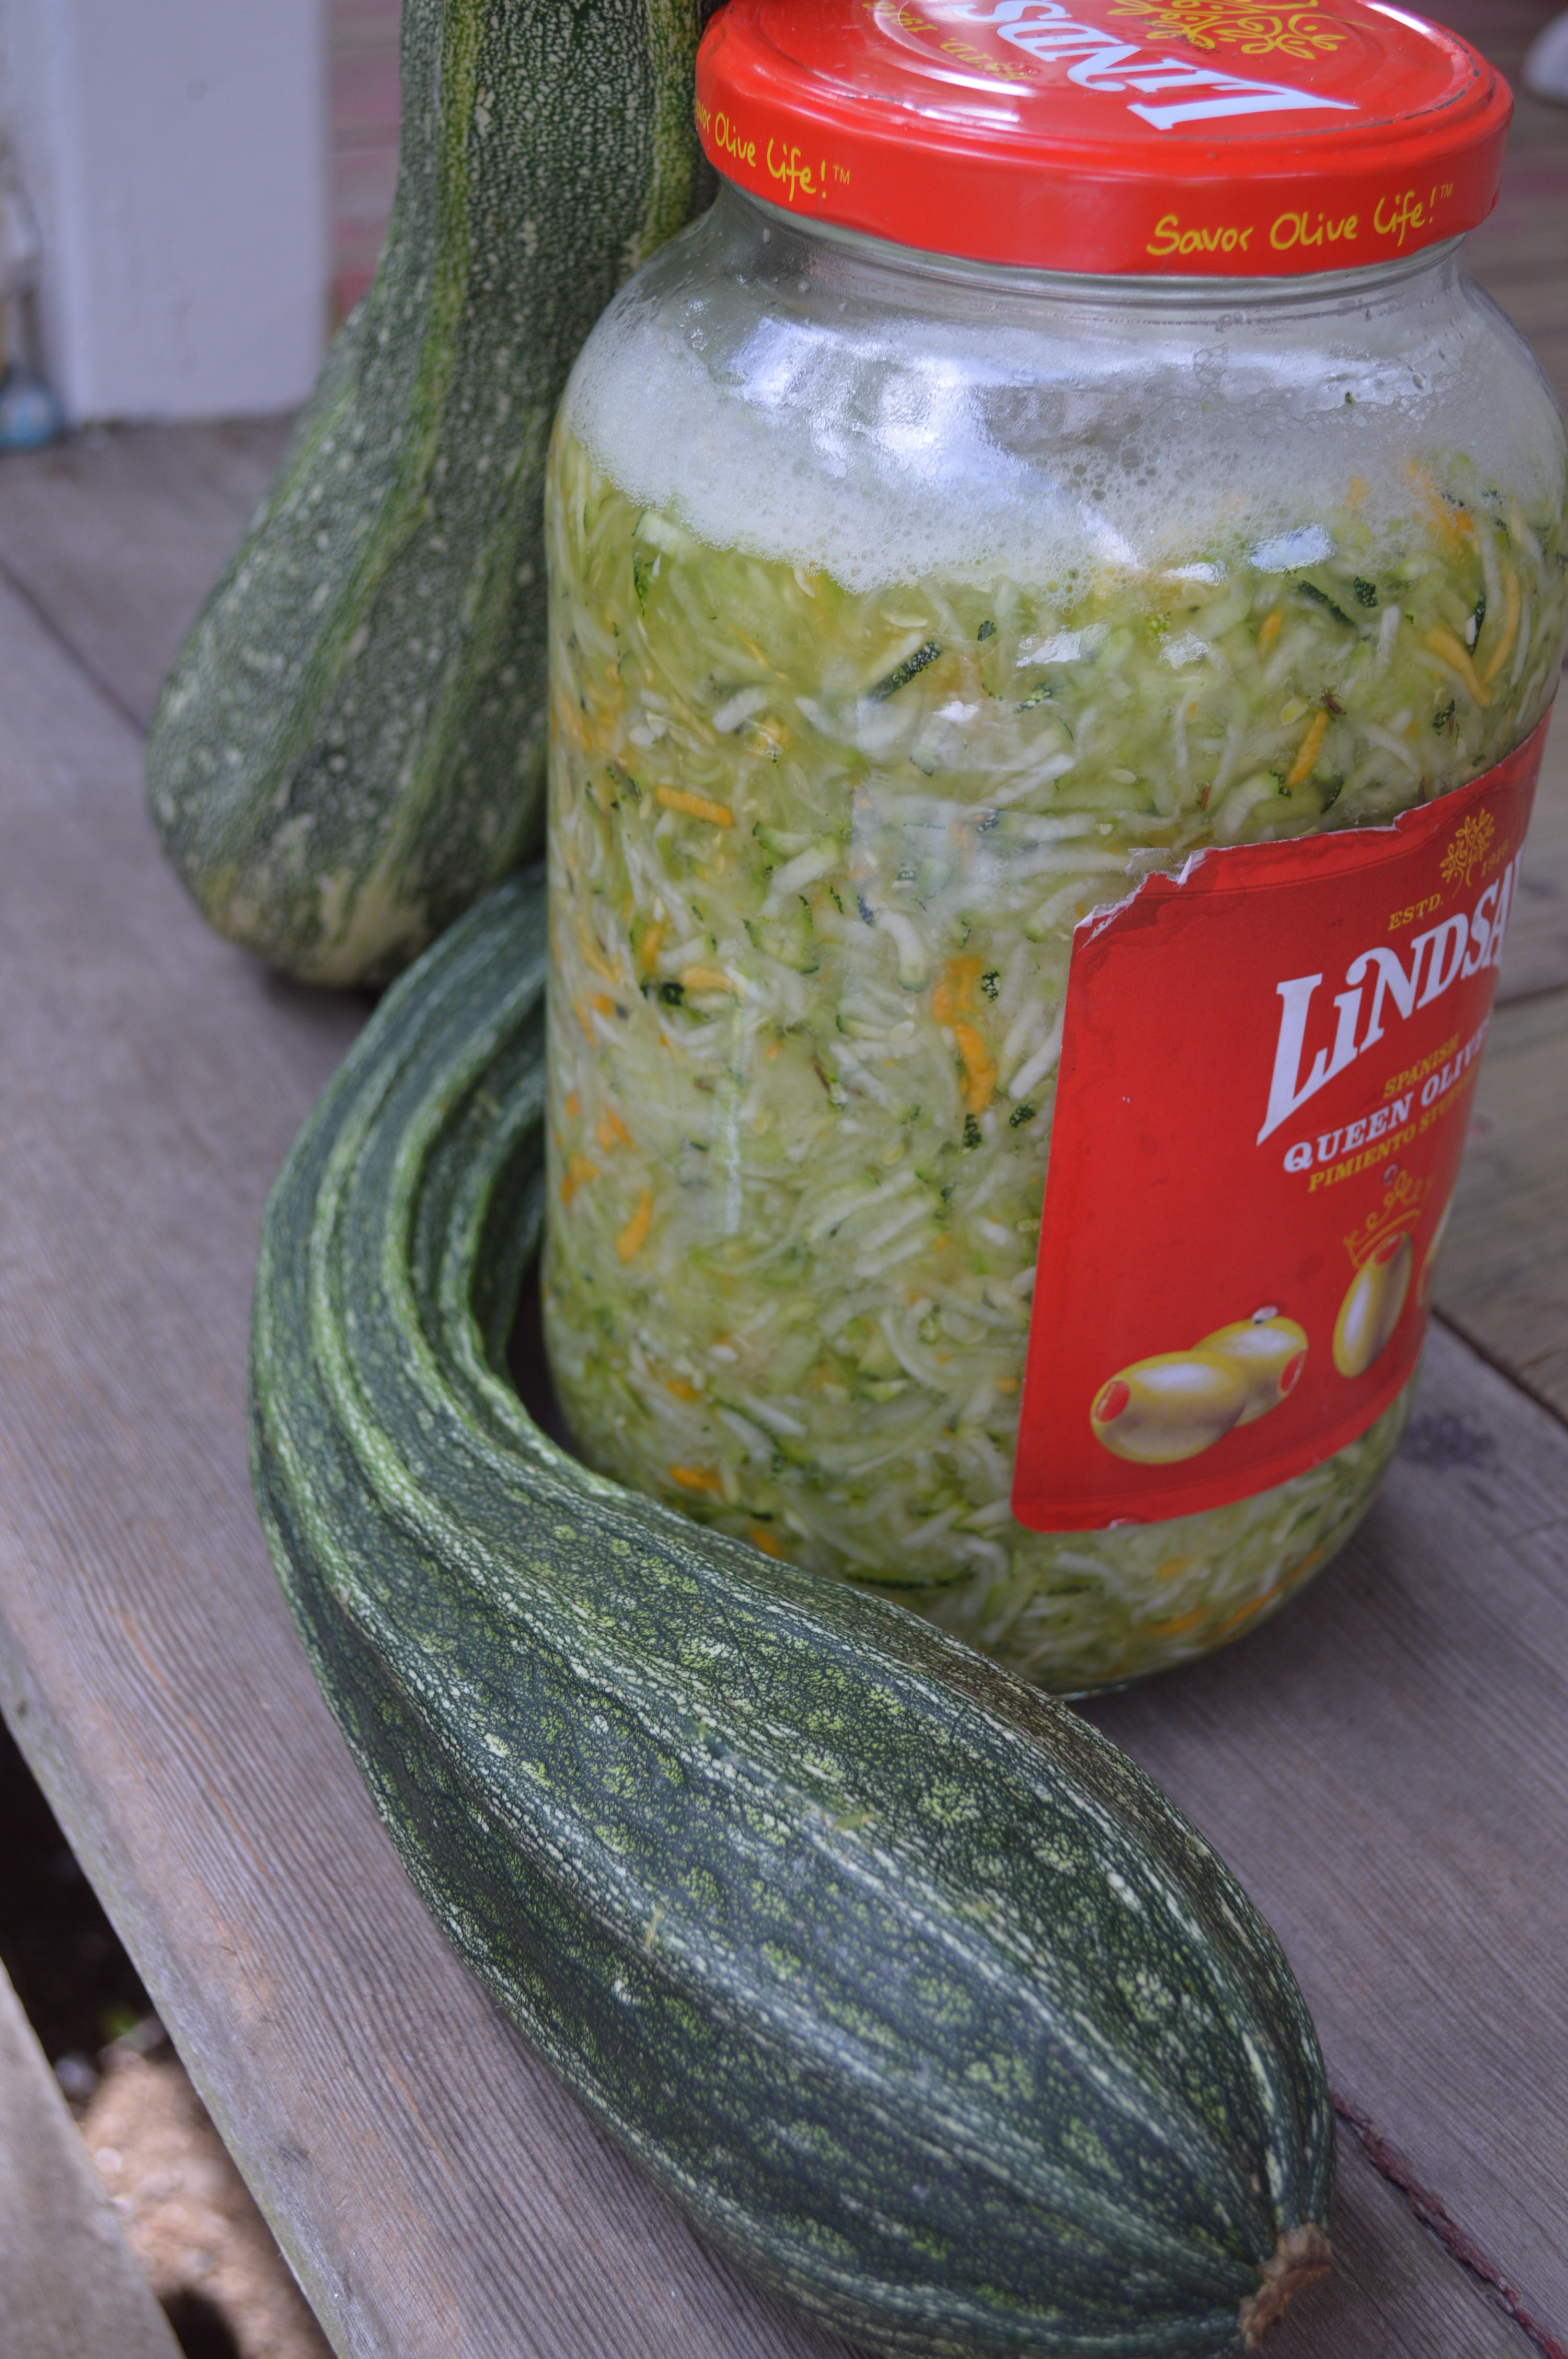
The Lima Bean Squash Taco with Homemade Kraut
I decided to cook up some of my heirloom Christmas lima beans and make a casserole. With a lot of work to do in preparation for the National Heirloom Expo, I need my energy. I had the food processor out with the shred blade on, as I was already making my pipinola (chayote) kraut. I was also sitting on several pounds of zucchini from a farm trade that I made with our local CSA. I decided to just keep shredding and make a taco seasoned dish that I could use throughout the week. Here is what I did: I had cooked the Christmas lima beans on low overnight in the crockpot with water enough to cover, and 1/2 of a Sweet Onion. I was already planning on using the beans, so I thought that all I needed was some more vegetables.I shredded one half of a large Hawaiian Sweet Onion, One large Zucchini, one pipinola(chayote squash) 2 orange habanero peppers, and 5 pickled hot peppers. I then poured the shredded veg into a bowl, and pulsed 2-3 cups of the now room temperature cooked lima beans. I added them to the bowl, and added two packages of taco seasoning, a sprinkle of sea salt, and a cup of breadcrumbs. I mixed it all together and pressed it into a 9×9 square pan, baking it at 350 degrees for an hour.
I’ve been making homemade kraut for several weeks now, as a means of capturing the harvests that come and go at both the farm and garden. The salty zing of the sea salt brine is welcomed after a hot day in the field. I thought, why not? Add it to the taco. I am happy to learn that this one taco casserole makes two completely different dining experiences. Fresh out of the oven, it is warm and comforting, with melted cheese and steamed rice for an evening meal, but the next day, it is bright and light as a chilled lunchtime taco with the ice cold kraut.
Since I am doing a lot of physical labor, I need a lot of food energy to get me through the day, so this homegrown, healthy taco had enough staying power to keep me going. Granted, my farmer portion was probably a bit larger than many would make. Overall, it was a simple feast made out of farm and garden goods. I will certainly make it again soon.
Try experimenting, I am sure carrots or pumpkin would be equally nice additions to the taco. Just think in terms of a meat loaf minus the meat. You can add two beaten eggs to the mix as well, or add chopped boiled eggs if you are a hungry one like me. As for the kraut, I have made a wide variety of them in my initial experimentation. It is all based around what is in arms reach. I have a few chili peppers producing now, and I always keep fennel fronds near. Though I am not a seaweed (limu) collector, I support those few that do here in Hawaii. I have been using seaweed as the majority of the salt in the recipe, topping off jars with just a bit more salt for fermentation. If you haven’t read it, you may enjoy my earlier post on my summer fermentation trials with pipinola (chayote)
Aloha from Squash and Awe

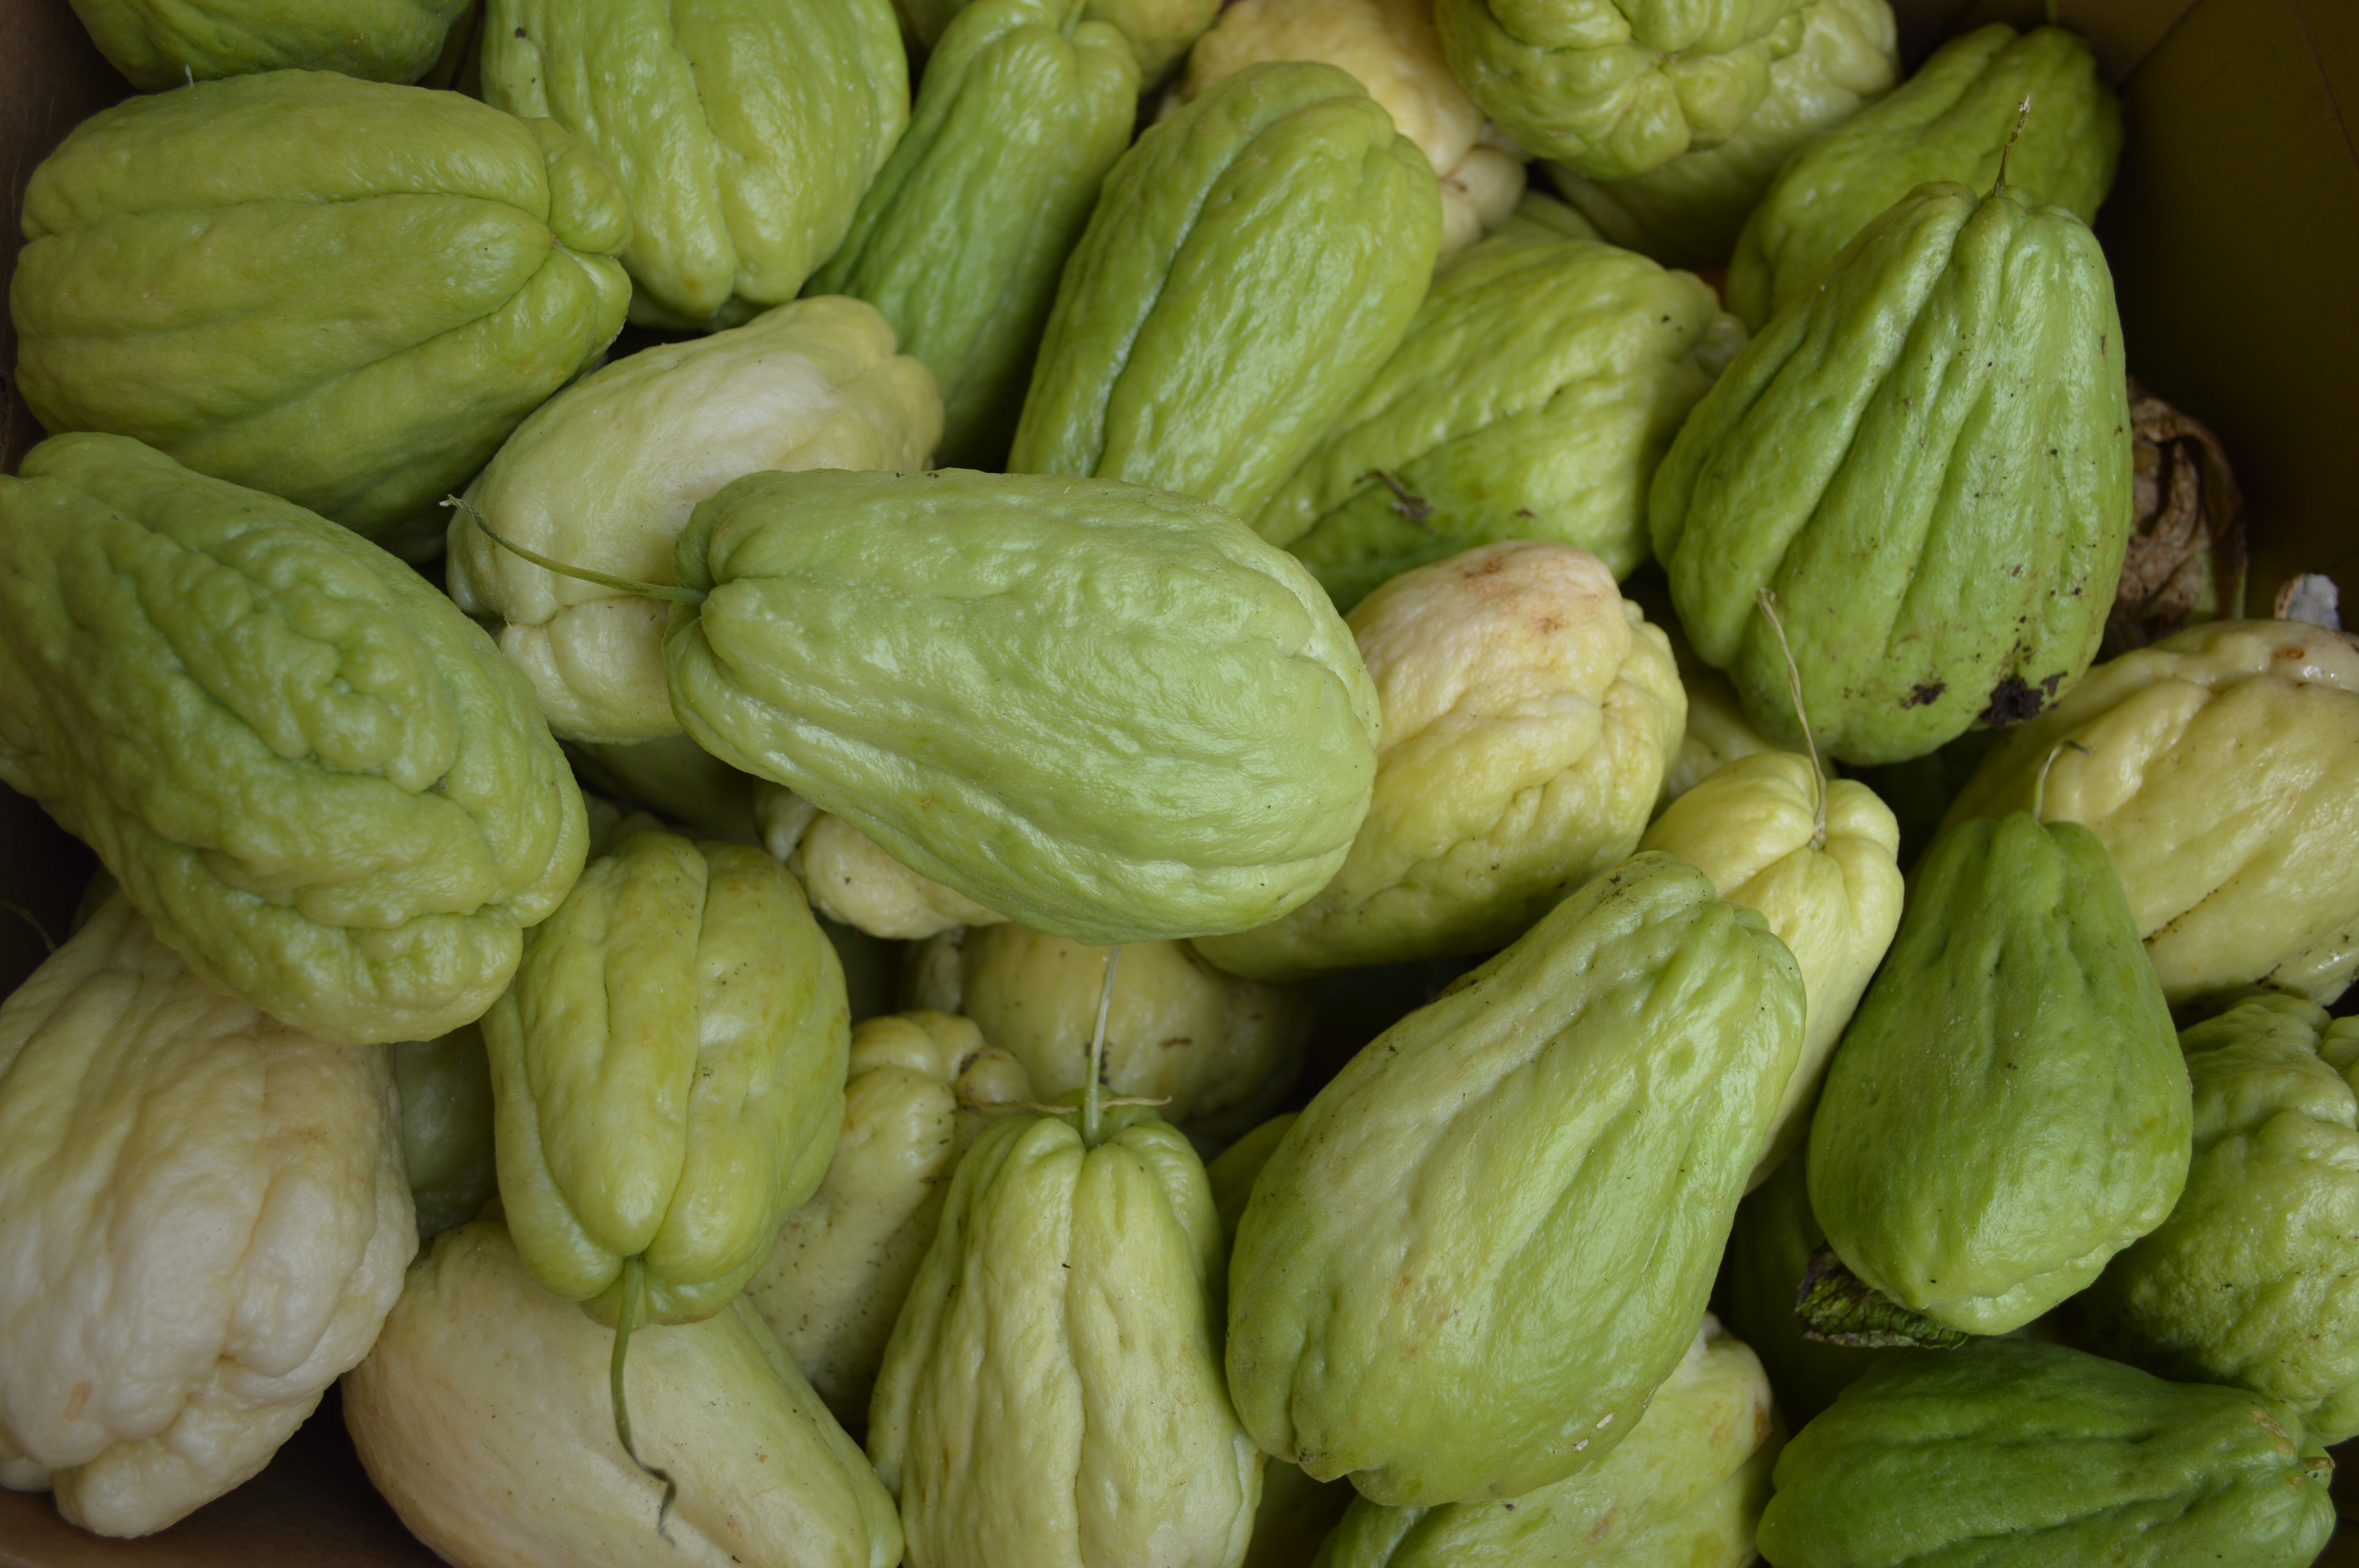
Fermenting My Way Through Summer: Pipinola/Chayote
For those growing in Hawaii, we know Pipinola, also known as Chayote, but we may not know what to do with it. This squash relative is a big climber, which can be a blessing, or not so much, depending on where it is growing. Edible from the chestnut like seed, to the fruit, leaves, and even the tasty stem tips too. Like all squash, every single bit of it is useful, and edible. Even the pig adores them, as she crunches them like apples. They do not have a great deal of nutrients, nor do they have a lot of flavor, which brought me to ask, “what do I do with a bushel of them?” When conditions are right, they will produce a lot at once.My method is to harvest, and follow by pruning the vines heavily twice a year. The green material is perfect for adding to your compost, the lush vines help to conserve garden moisture, and they make for a very useful pig food/bedding making for what I call Hannah’s edible bed. The vines will soon produce more than you know what to do with, or at least that is how it was, but now this changes everything.
As I was sorting through vine and pipinola fruit, separating the split sprouting fruits out so to replant, or fed to the pig. The small medium and even larger ones seemed to have untapped potential. An idea popped into my head: could this be fermented? I kicked off the rubber boots and looked it up online. In the Americas, expats often use them for kraut. There were several references to how they are available in Mexico, Central, and South America, by the bag or bushel. Elisa Fusi charmed my idea with this wonderful blog post about her organic farming and cooking while visiting Panama. More and more recipes turned up as I sat by the computer. I was growing excited, and needed to begin. I keep couple cases of jars on hand at all times, because, you just never know when a storm is going to hit and you need to put up a bushel of something.
The recipes varied primarily in the way they let the fermentation take place. Some used jars with lids, some used crocks, one used a bowl covered in plastic wrap. I decided to use the jars, since my counter space is limited, and having them ferment in the jars seemed one step closer to being completed.
Each recipe called for a slightly different amount of salt as well. So here is how I did it:
Washed down counter, cutting board, and selected a knife.
Pulled a box of kosher salt and a large glass bowl out of the cabinet.
Washed jars, and set them aside with new lids

I pulled out the ol’ trusty thrift store Cuisinart, and selected the shred blade, feed tube pusher, and the tool that slides into the shred blade and fits it to the machine. I made a nice work area with several clean dish towels up and out of the way.
I washed and sorted the pipinola/chayote, then quartered or halved them to fit in the food processor feed tube. I left them clean and in two colanders so to keep them close at hand. There is no need to dry them.
Next, I rifled through the spice drawer looking for underutilized, but fresh spices. Several recipes called for caraway seed, which I use in my Irish Beer Bread. I am sitting on a goldmine of fennel seed and lemon grass too. I pulled some garlic too.
Then I started shredding until I filled the whole container. Then emptied it into the glass bowl. I added about 4 teaspoons of salt, to over a quart of shredded squash, a dash of caraway seed, and minced two garlic cloves. I massaged it all together for about 5 minutes. In that time, the pipinola begins to foam and release liquid. I then loaded the soon to be kraut into jars, leaving an inch of room at the top, and pressing the mixture down firmly. Liquid should cover the kraut. The lid is screwed on, and they were placed one after the next onto a shelf out of the sun.
I could have walked away at that point, but instead, I kept going. I had just bought fresh seaweed, and the orange Habanero were producing, and I cannot make anything without pumpkin, I was skidding into a creative buzz. So I kept going, and trying all kinds of made up combinations. I treated each in the same manner, of packing the solids down, and having enough brine to cover them. I backed off on the salt when adding salt-laden seaweed, I pumped up the garlic and chilis to make a sort of “Squash-chi” kraut kimchi combo.
Each day has begun with my taking five minutes to open them all, release any air pressure that built up, and then smoosh down the solid material so to keep it pressed together, and below the brine line. We are now at day 4, and I have already eaten a pint through my daily sampling, so do make plenty. I have just gifted jar today, and I am sure there will be some requests for trades.
I made a trade today, exchanging my pumpkin for zucchini, I thought that that may be nice to use as well. I picked up some Hawaii grown Sweet onions too. So the day is filled with promise for fermentation, since I still have most of the bushel of Chayote still to go. Overall, it was easy, fun, and I felt like it made a great product out of a rather extraordinary harvest.
These will all be refrigerated in the next week. They will then keep in the fridge for months.

Spoonable Heirloom Chili Pepper Oil
No matter whether you like your meals spiced mildly or for maximum heat, here is a simple way to capture the delightful tastes of heirloom chili peppers. This ten minute process will allow you to keep some summer heat long after production stops, or for those of us with come and go chili seasons, it captures the bounty until it returns.

When I returned from the Ozarks, there was a wide array waiting for me to select from. I decided to make a nice hot version with the sun ripened fresh chilis. You can make a mild oil by using mild green chilis, then up the heat with ripe ones. The olive oil diffuses the flavor in a way very different from hot sauce. I like to start with a couple handfuls of peppers fresh from the plants. I cut off the stem end, and reserve the cuttings for my fire-breathing flock of hens. Cayenne tends to be the top poultry pleaser. They often get into a scuffle over the pepper bits. I have read that it is healthy for them, just like chilis are for us.
Then simply drop the trimmed peppers into the food processor container that is fitted with the chopping blade. Be careful not to breathe in the crushed chili fumes, as it will irritate your lungs. Some people prefer to use safety glasses and gloves as well. This process allows the food processor to do most of the chopping, instead of you, but use caution regardless.

Pulse them to a fine chop, and add a bit of olive oil at the end, so to make the mixture easy to pour. Garlic lovers: peel and add a couple of cloves to the container and pulse them right along with the chilis.


With a rubber spatula, scrape the sides of the container as you pour the chili mix into a clean 1/2 pint or pint jar. I make this by the pint, because I use it in so many things. It adds a refined chili infusion rather than over the top heat. Top off the jar with more good quality organic olive oil. Place on the lid, and shake lightly. I will leave this jar on the counter overnight for the flavor to set, then invert the jar onto a plate, and place in the refrigerator.

As the oil is refrigerated, it will solidify. Turning the jar every couple of hours, or at least once before it is solidified, will make the chilis more evenly dispersed. When I use up the top 1/2 of the jar, I often add more oil and mix it in with the glut of chilis that sunk to the bottom of the jar.

I like to take a heaping spoonful, and use it as you would use olive oil in any recipe. I use it mixed with basil, garlic, and rosemary to marinate my pumpkin slices on the grill. It is lovely mixed into stir fry, with greens, spaghetti sauce, and mixed into plain rice. The olive oil will return to liquid at room temperature, so spoon out what you need, and return the jar to the fridge for storage. Try dragging a piece of toasted garlic bread through it, or drizzling over pizza instead of pepper flakes. The uses are endless, and it will make a well seasoned meal in minutes. This oil should last a couple of months in the refrigerator. Mine rarely lasts, simply because it is a part of so much of my cooking. Enjoy this little bit from pepper paradise!

No Bake Avocado Pie with Salted Pecan Crust
If given the opportunity to dine on avocados everyday, I would. This time of year, in upcountry Hawaii, that opportunity arises. So what better way to celebrate then by doing a series of kitchen trials to celebrate both Tahitian limes and avocados. Last night I made swipe #3 at a DIY version of avocado pie. I wanted to see what would happen if I mixed in two things that work well with avocado: salt and lime. Here is what I did for this spoonable desert…that is disappearing as fast as I can type.
No Bake Avocado Pie (Gluten Free variation)
Crust:
2 T butter
one bag of pecans 10-12 oz or so
coarse sea salt to taste
Filling:
2 large ripe avocados, 8 oz block cream cheese, lilikoi syrup, powdered sugar, juice of 1 lime.
I used a food processor for the lot. Place nuts, and butter into the container, and add a pinch or two of sea salt. Pulse and taste. It should have a salted nut quality to it. Once pulsed to a crumbled texture, remove and press into the bottom of a pie pan. In the same container, pulse the cream cheese, avocado, and lime juice, then blend well by putting the food processor from pulse to ‘on.’ Add your desired sweetener. I chose lilikoi (passion fruit) syrup made by my friends in Hawi, and powdered sugar. High quality local honey or agave would also work, or powdered sugar on it’s own. Stop the blending, and try the mix. It should taste sweet, but not over the top. add a touch more sweetener if needed, Blend well. Spoon onto the nut “crust” smoothing as you go, and place filled pie plate in the refrigerator. It is a simple little dish that can be made in under 10 minutes, when you have ripe avocados that need to be used. This desert could be expanded into a full on cheese cake, but when in a rush, this little gem does the trick.
