Upcountry Hawaii is often overflowing with avocados in the Winter. They have been sliced, scooped, mashed, and now roasted. I often clean my kitchen cabinets this time of year, and one of the items that I discovered was an unopened bag of Japanese style bread crumbs, known as Panko. With the winds, and heavy rains bringing down even more avocados, I roasted warm dish was in order. I selected a perfectly ripe one, cut off the bruised bit where it fell to the ground, and sliced it into planks. Next, I beat one egg, and dipped the avocado in it before dredging through the breadcrumbs. I lined them up in a baking dish, and sprinkled them with seasoned seaweed flakes. I set the oven to 450 and let them turn golden (about 15 min.) For a dipping sauce, I combined chili garlic paste, sesame oil, tamari (or soy) sauce, and two spoonfuls of my lemongrass tea (optional.) The result was a lovely warm appetizer with a Pacific twist. I ate it as a meal, but it could be served as a side as well. Simple, healthy, and using our produce abundance in a new, tasty way. Aloha.
Category Archives: Zero waste

Top 5 things I do prior to travel
I get a lot of questions about how I manage to get away from the farm. There are several things I “set up” prior to my departure that makes all run a bit more smoothly.
1) Amend the soil with farm made fish emulsion. A strong plant will have a higher chance of surviving/and or fruiting.
2) Refill tropical fruit fly stations and secure them against wind. This will keep pest pressure down while the farmer is away.
3) Make microbe rich bokashi and add to compost tumblers and composting piles.
4) Trim vines back all around irrigation heads that are set on timers. This will help keep the vines from blocking the flow of water to your plants.
5) Make new buckets of fish emulsion. They will ferment while you are away, leaving you well stocked with natural fertilizer when you return home.

The Right Tool for the Job
Farming and gardening are tool driven activities. But how much is enough, and how much is too much. Since I run a zero-waste farm, I also encourage others to source used tools. Used tools are often better tools. Why? Well, the quality of materials has made a sharp decline in the last 10 years, but a drastic drop in quality in the past five years. I enjoy going to resale shops in search of things made of metal and wood. On one such scavenger mission, the lady checking me out said, “hmmm a bunch of junk.” I smiled and said in return, that “metal junk is better than plastic junk.” and she agreed. For $5 I picked up some hand tools, and an adjustable spray nozzle. They did look rough, agreed, but they were made of metal and will far outlast their contemporary counterparts that you find in big box stores.
I decided that I didn’t need “pretty tools” but I do need durable ones. Not to mention giving them one last use is always on my mind. The spray nozzle is hard to find now, as many have been replaced with bright colored plastic that does not do well with all the things garden tools need to handle, like heavy usage, and sun. Same goes for the tools, some of the metals that are used for lower end tools for both the garden and garage are flimsy. The metal has bent in my hands. I would choose rusty over new any day. Check and see if the tool can be repaired. Can a good solid head for a hoe be put on a new handle? Granted a new handle can cost the same as a new hoe, but some of the new heads on hoes and shovels are almost a throw away from the start.
The pruners in the image are a junky new ones, that are not fantastic, unlike the quality (and cost) of the high end European ones. With some oil and care, they can be put to use again. The scrub brush on the other hand is a new brush made of palm fiber. They are brought into Hawaii from Japan. I like them, because I dislike plastic scrub brushes. This one is cheap, natural, breaks down in the compost (leaving only a piece of wire behind) and it dries fast in the hot sun, which is important for sanitation.
So take a look around next time you are at a resale shop or tag sale. Don’t be afraid of a little surface rust. They will serve you well, and if you get a rainy day, you can look up online or in a library how to care for them, or even refurbish them. My $5 shoebox of tools would have cost over $100 new, and I have avoided a lot of cheap plastic and cheap quality metal. It just makes sense in so many ways. Ask yourself, “does it need to be new?”

Squash Rich Soil Poor
Two years ago, I planted a new area with squash, I was hopeful and optimistic. It was open, free of the Iron wood trees, but it desperately lacked soil and the area needed serious rehabilitation. I thought I had given it a good look over, but what I had underestimated was the wind. I was fortunate to have timed my plantings in a year where heavy rains broke the 15+ year drought. The plants thrived. But then the winds came, and destroyed the raised beds, made irrigation very complicated, while also setting back my optimism. Those Winter rains were a fluke, and they haven’t returned again. The wind gusts, on the other hand, have returned with great force, just when you least expect them. For the last two and a half months it has been blowing, then punctuated by dead calm. As a personal challenge, I decided to rethink that area, and figure out how to do raised beds in a wind gust area while also using minimal irrigation. I needed to figure out a way to farm rock.
I walked the area with Randy, the AG (mainly pest and plant disease) inspector. He kicked the ground and noted that they call it the Kau Desert for good reason. He is facing retirement at a time when farming in Hawaii has hit some pretty hard times. My projects seemed to offer him hope and a few smiles in is last years as an AG field agent. Farmers often speak of rocky soil, but this isn’t that. This is rock, period. 100 years ago, and as recent as 50 years back, the Japanese farmers of this area just removed rock day after day. When I say rock, I should note that they are boulders. They created areas of farmland from this rocky outcropping. Some areas are now cultivated by tilling methods, some are run as ranchland, and my borrowed parcel is run as no-till. This Spring I am again facing off with the hardest to farm section of the property. Here, patches of rock that have been exposed by years of wind erosion, and that hard layer of stone will be under my beds. Under normal circumstances, you would never plant on top of rock, but this is a test of possibility. If you can grow there, your system will grow just about anywhere.
The above photo shows what the ground looks like under the new garden system that I am creating. Roots will not be able to penetrate those stones, so all that they need will have to be delivered through the raised bed system. The soil that is there is no longer capable of absorbing and retaining water. But soil has an amazing ability to be transformed back into a condition where it will absorb water. So let’s get to work…what needs to be done? First think about your wind and wind directions. Where is it blowing from most of the time? I am planning on running one simple soaker hose through the base of this bed. Overhead isn’t going to work like it does in my other patch. In the main patch, overhead works, because whenever the wind blows, it will blow the water onto a plant, in this area, that isn’t so. Also minimal overhead irrigation works in the other patch because of the tons of soil building materials that were reclaimed and put to work as a living mulch. A technique that works in one area may not work right across the road. So once you think through your irrigation strategy, think about the movement of the sun. In Hawaii, you can really notice a difference in the direction of the sun’s rays, season by season. Lastly, is it in a location where you will be able to check on it easily? Anytime you are doing a test project, a watchful eye is going to lead you to learning from the experience.
I reused some wire table tops for multiple reasons, I wanted to see if they would:
1)keep the wind from tipping over the stacked design of the beds
2)keep the chickens out
3)create a sturdy base for a trellis
This is what they look like with a variety of squash and edible gourds creeping through.

Not bad, but it gets better. Since I have been working to locate and breed heirloom varieties that are disease resistant, I am putting that to the test as well. Powdery mildew knocks growers flat when they first start growing in Hawaii. This method of mine would never work without the prior, careful study of natural disease resistance. So in other words, know your plants first. I am planting absurdly close plantings of all kinds of things: tomatoes, beans, mustard greens, tomatillos, even some flowers. Most of these I have grown before, but some are new to me heirloom varieties that are getting their “test” here at the farm, such as the Zuni Gold bean that is loved in New Mexico. We see how things turn out for them this year.

The idea is to create a mini food forest with tier upon tier of food. It is my own interpretation of the “Three Sisters” planting method, combined with another Native American technique that includes burying fish. I have fermented the fish first, adding much needed microbes to the mix. My compost scares people. But I am in Hawaii and we don’t even have compost facilities anywhere near where I live. I became the compost facility by working with my chef customers. Raw and fermented material is at the bottom, and it will have plants growing above it.
The close plantings will be a “only the strong survive” kinda deal. Plants can “work it out” and find their ways to get enough sun, water and nutrients. So far, they are working together nicely. are two months in. These close plantings also protect from the drying, harsh winds. These close plantings also create strength in numbers by supporting each other against the gusts. High winds can snap tomato and tomatillo stalks, even with some trellising. This will help your system to better take care of itself. Not only will this planting method provide a great variety of foods and beans will add nitrogen to the soil, it is also planted with bees in mind. Bees area squash growers friend, but unfortunately, they are few in number here where I grow. So I make a bee buffet of all kinds of blooms. I plant in harmony with the native Hawaiian plant Ilima and give those small blooming shrubs extra care and nutrition, and they supply lovely blooms to attract our bees.

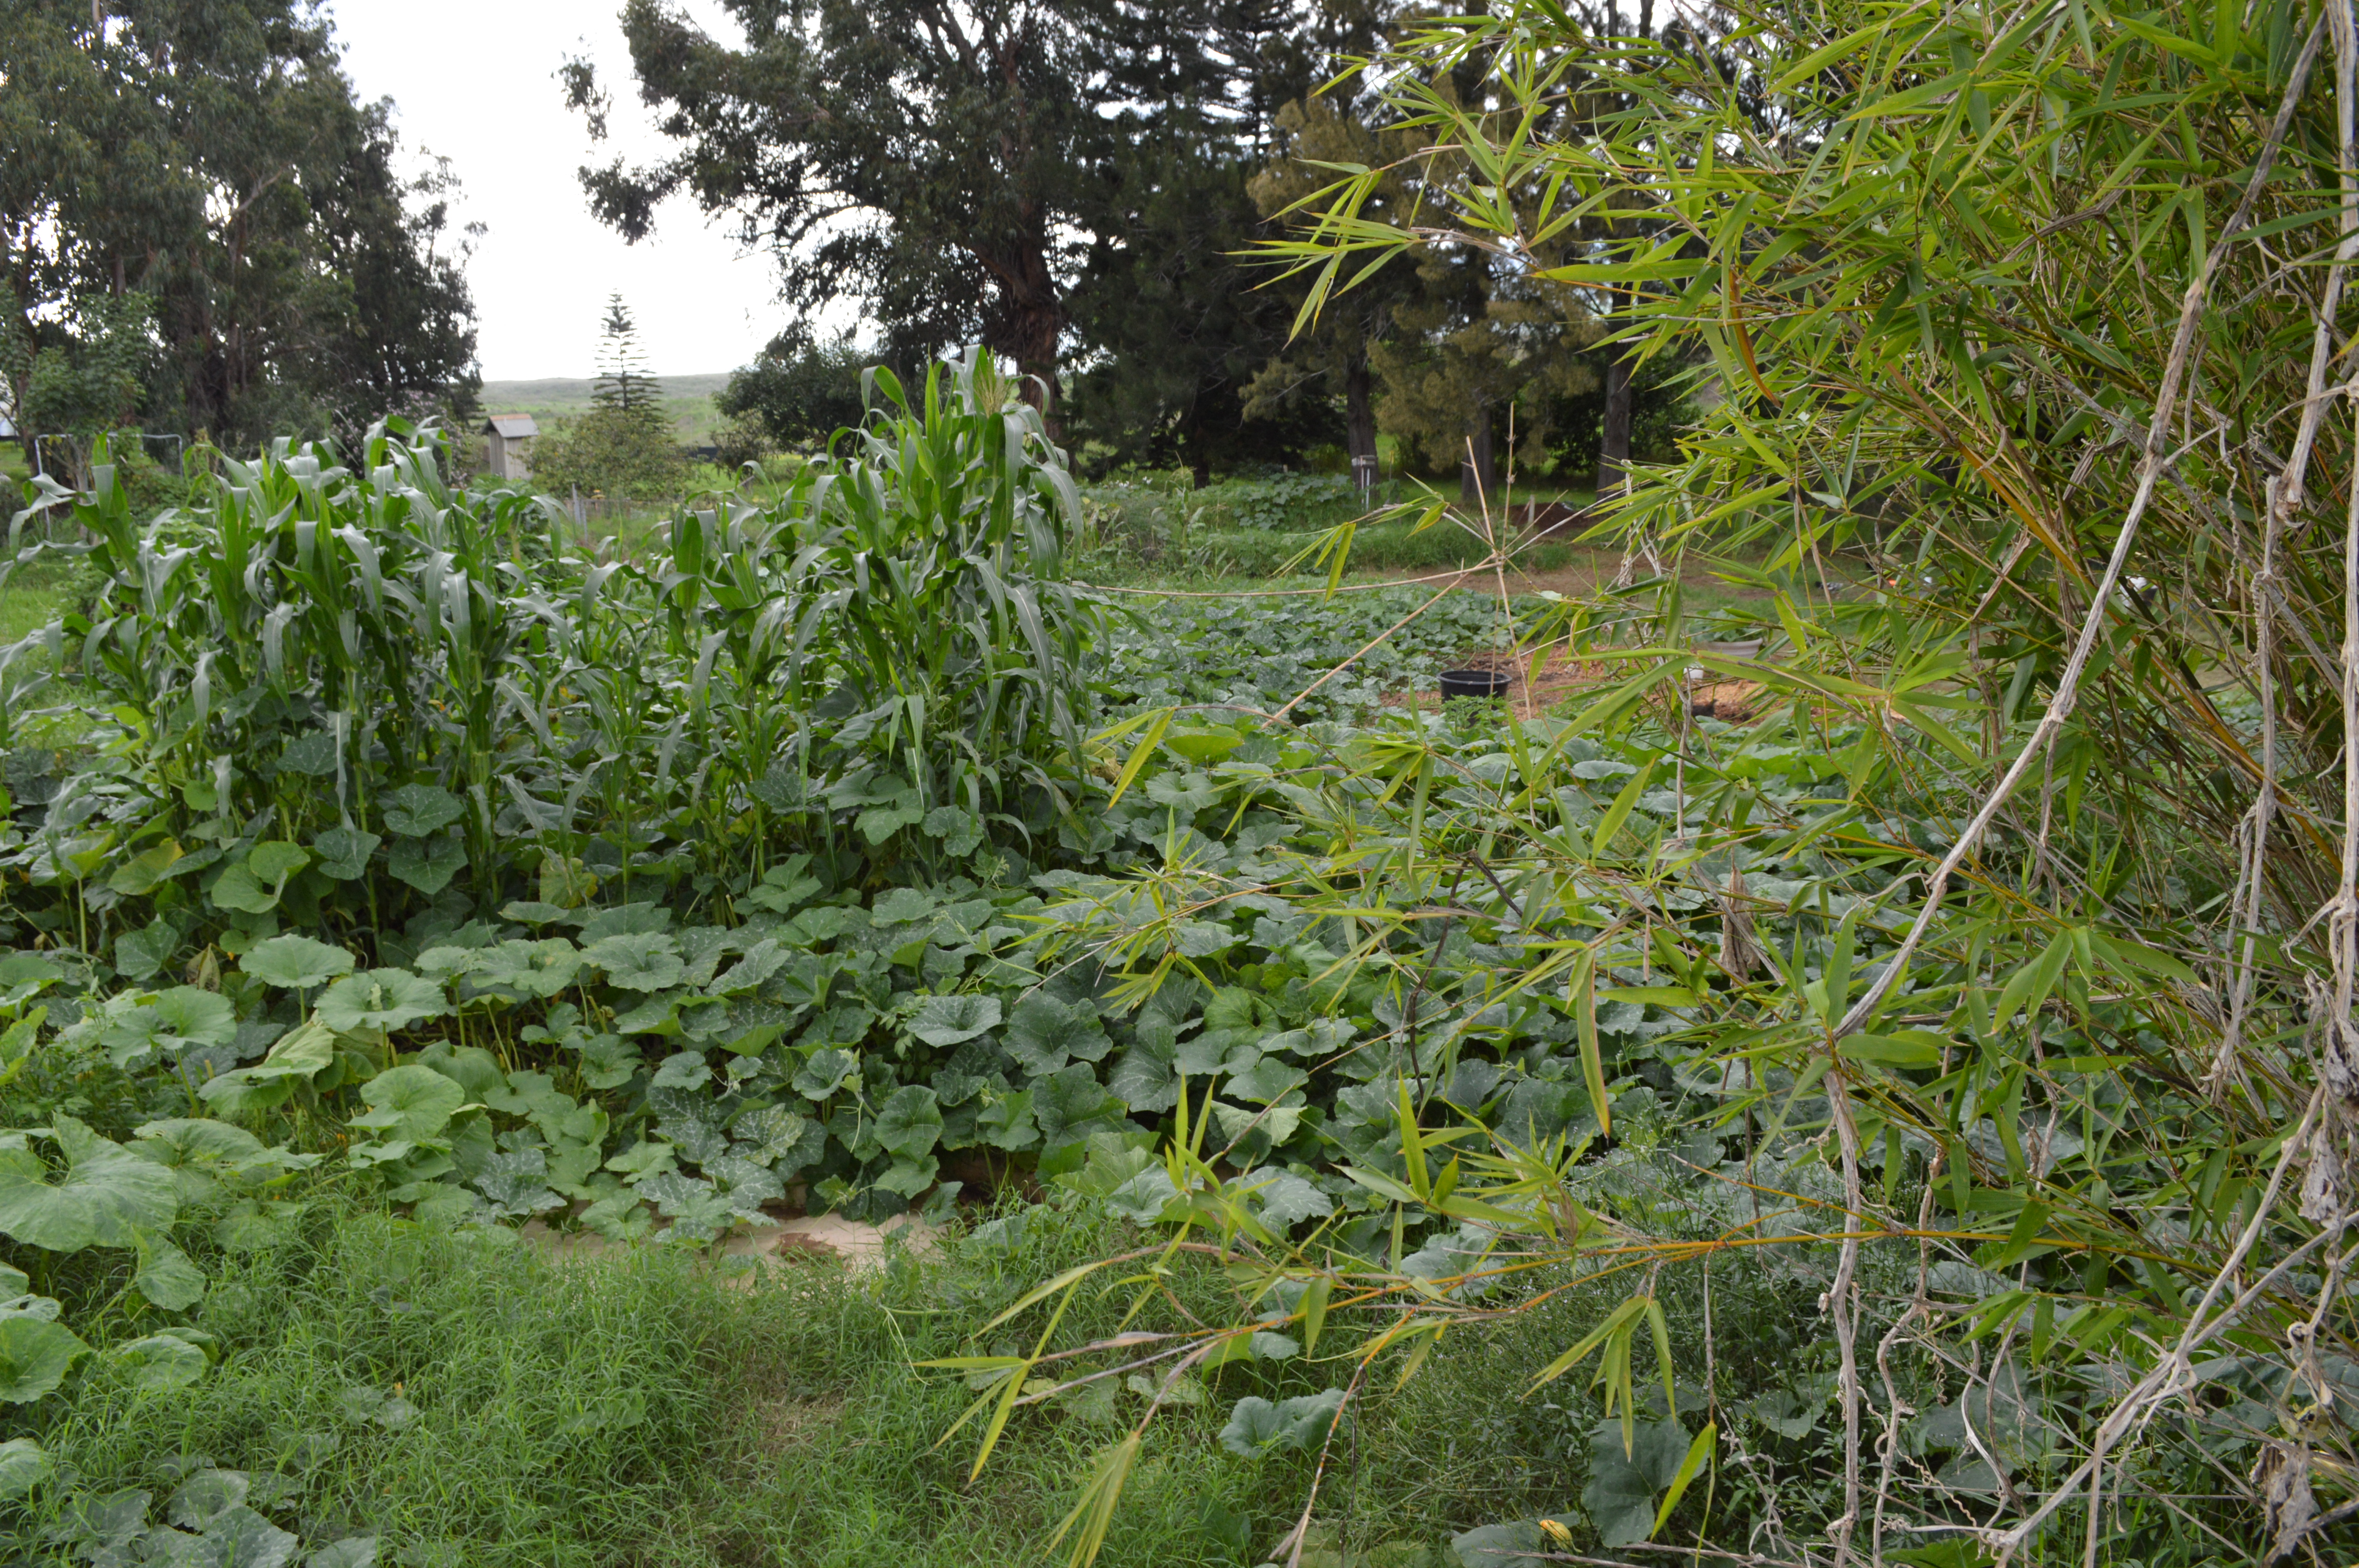
Here we see tomatillos growing in harmony with the squash plants. Those bright yellow blooms will be a beacon to the bees. Strings run up from the table tops to a simple bamboo trellis that has the ability to shift in the wind. It has already withstood nearly 20 days of heavy wind, so it has proven itself. 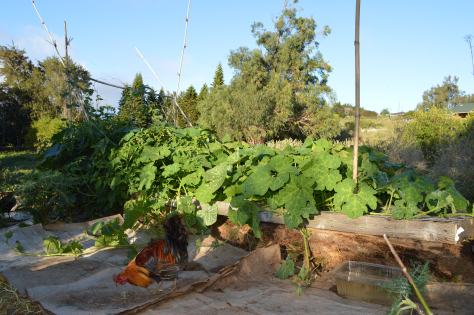
As for the chicken proofing, Hunter is seen here patroling the surrounds while not disturbing the plants themselves. The chickens and I have all enjoyed their collecting of many harmful to the garden insects. I should also note that these plants are growing in very raw compost, and all reclaimed materials were used. This is not something that I advise you to do, but I am doing it as a means to see how fast the restaurant waste can turn to soil. It can be done with careful planning, and a lot of trial and error. I will leave that for another post. So I encourage you into thinking of creative ways to grow your food, create your soil, save our water and nourish our bees. If this can be grown on rock using restaurant waste, so much is possible.

Farm Clean up: the no-till way
In the frantic days before I leave for California, I needed to put some serious order into the farm. I will be going to help harvest the Baker Creek pumpkin seed trails, and just a couple weeks later, I will be giving my speech at the National Heirloom Expo. The excitement is building, because one of my very own farm pumpkins is a part of the trials. I’ve worked hard so to stabilize the variety. I am hoping that when I get there, it will be shining in the sun, and offering resistance to the drought there. But for now, I need to focus on getting my own crop in order. Pumpkin growers frequently count the days when you need to hit your harvest right on schedule for October, and we in tropical and subtropical places need to look 120 days out, and sometimes more.
Hawaii’s high season also creeping closer, where the demand doubles. So, it is simply now or never. This year is a big soil building year, as well as planting all new pumpkin vines. It has been a long summer with quite unexpected weather patterns. We had Winter-like weather for weeks, including flooding, and now it is like Summer again. Adaptability is the name of the game.
The soil strategy is working. I have brought in several tons of hops, mixed them with wood chips from the farm, then piled them on top on salvaged cardboard. The trick is to turn the piles, carefully, letting them air out in all this heavy rain. For those of you just tuning in. In the farmlots, we got several days of flooding after 17 years of drought. Quite a change, but not entirely a surprise. Why? The drought/flood cycle goes together, like it or not. You cannot change the weather, but you can change your soil’s ability to adapt to changing weather. Adding soil structure through organic mulch materials, and valuable nutrients both help. This improvement to soil health also encourages the earthworm, and microbes…and on we go.
People are often overly concerned about how no-till looks, but really, it doesn’t matter how it looks, what matters is how is responds to the needs of your plants. We need to get over our thinking that everything needs to be in tidy rows, with nice big parched earthen walkways between. We are in a drought, and there is a lot more drought coming our way. By planting very close in super homemade soil, the healthy plants adapt and even help one another. I seed select only from varieties that are naturally resistant to powdery mildew (a huge problem in Hawaii) and then I can just let the vines sprawl, without worrying about close planted plants and powdery mildew. What people usually do not see, but you can in these images, is the under story of the mulch. Ever wonder why I have giant green squash leaves the size of platters? It is because I have created a natural fertilizer system on which they grow. When water hits a vine, it encourages it to re-root where the vine touches the soil, or in this case, where the vine touches the nutrient mulch. I can encourage growth by burying the vine, (like giant pumpkin growers do) and encouraging more roots to form and uptake more nutrients. This system is why I get so many tons out of a tiny parcel. A squash plant often produces 2-3 pumpkins, mine may produce 10 times that, because I feed and prune and feed some more. They are spoiled with love.
Here is a look at the mulch before the vines cover the lot. The system is as follows: cardboard, hops and wood chips mixed, some coral sand, coffee grounds, and fermented fish (buried in holes here and there.) Throughout the season, I will feed again with homemade fish emulsion, and top dress with more coffee grounds. Then too, I will add some EM-1 soil microbes fermented in grain to the field. Most of soil making is being done below those sprawling vines. Compost materials are the mulch. Soil is the solution.

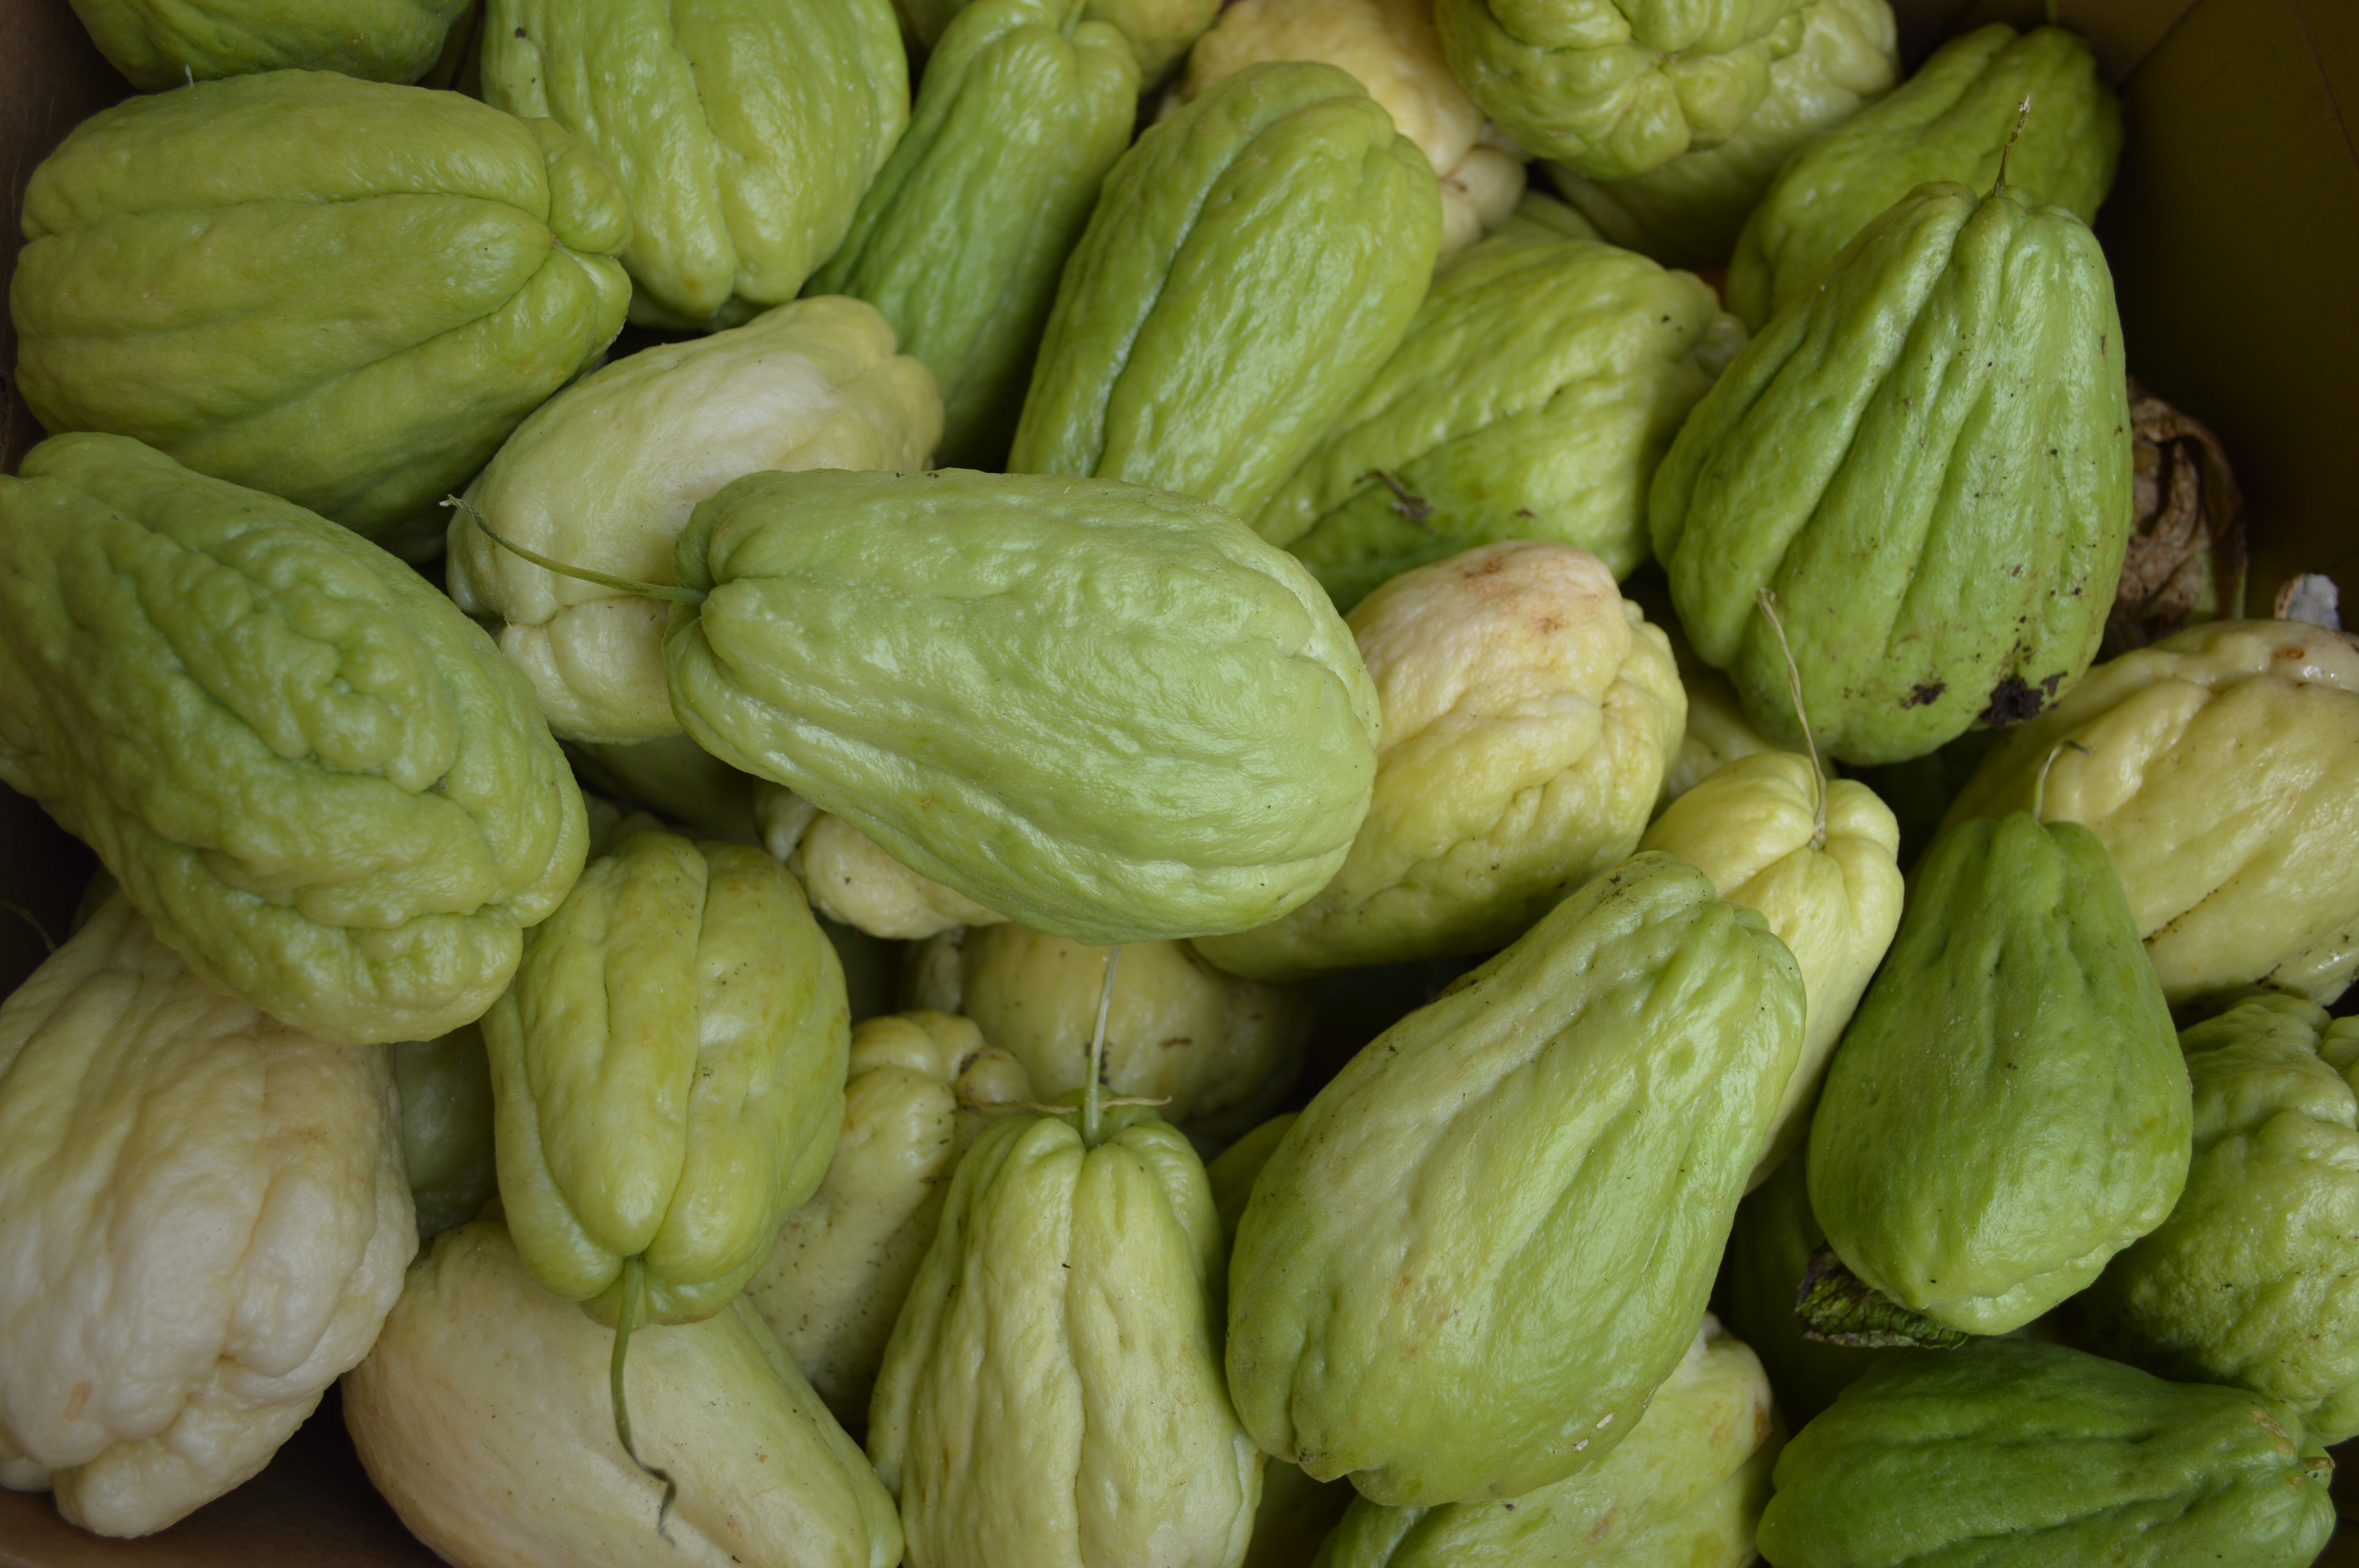
Fermenting My Way Through Summer: Pipinola/Chayote
For those growing in Hawaii, we know Pipinola, also known as Chayote, but we may not know what to do with it. This squash relative is a big climber, which can be a blessing, or not so much, depending on where it is growing. Edible from the chestnut like seed, to the fruit, leaves, and even the tasty stem tips too. Like all squash, every single bit of it is useful, and edible. Even the pig adores them, as she crunches them like apples. They do not have a great deal of nutrients, nor do they have a lot of flavor, which brought me to ask, “what do I do with a bushel of them?” When conditions are right, they will produce a lot at once.My method is to harvest, and follow by pruning the vines heavily twice a year. The green material is perfect for adding to your compost, the lush vines help to conserve garden moisture, and they make for a very useful pig food/bedding making for what I call Hannah’s edible bed. The vines will soon produce more than you know what to do with, or at least that is how it was, but now this changes everything.
As I was sorting through vine and pipinola fruit, separating the split sprouting fruits out so to replant, or fed to the pig. The small medium and even larger ones seemed to have untapped potential. An idea popped into my head: could this be fermented? I kicked off the rubber boots and looked it up online. In the Americas, expats often use them for kraut. There were several references to how they are available in Mexico, Central, and South America, by the bag or bushel. Elisa Fusi charmed my idea with this wonderful blog post about her organic farming and cooking while visiting Panama. More and more recipes turned up as I sat by the computer. I was growing excited, and needed to begin. I keep couple cases of jars on hand at all times, because, you just never know when a storm is going to hit and you need to put up a bushel of something.
The recipes varied primarily in the way they let the fermentation take place. Some used jars with lids, some used crocks, one used a bowl covered in plastic wrap. I decided to use the jars, since my counter space is limited, and having them ferment in the jars seemed one step closer to being completed.
Each recipe called for a slightly different amount of salt as well. So here is how I did it:
Washed down counter, cutting board, and selected a knife.
Pulled a box of kosher salt and a large glass bowl out of the cabinet.
Washed jars, and set them aside with new lids

I pulled out the ol’ trusty thrift store Cuisinart, and selected the shred blade, feed tube pusher, and the tool that slides into the shred blade and fits it to the machine. I made a nice work area with several clean dish towels up and out of the way.
I washed and sorted the pipinola/chayote, then quartered or halved them to fit in the food processor feed tube. I left them clean and in two colanders so to keep them close at hand. There is no need to dry them.
Next, I rifled through the spice drawer looking for underutilized, but fresh spices. Several recipes called for caraway seed, which I use in my Irish Beer Bread. I am sitting on a goldmine of fennel seed and lemon grass too. I pulled some garlic too.
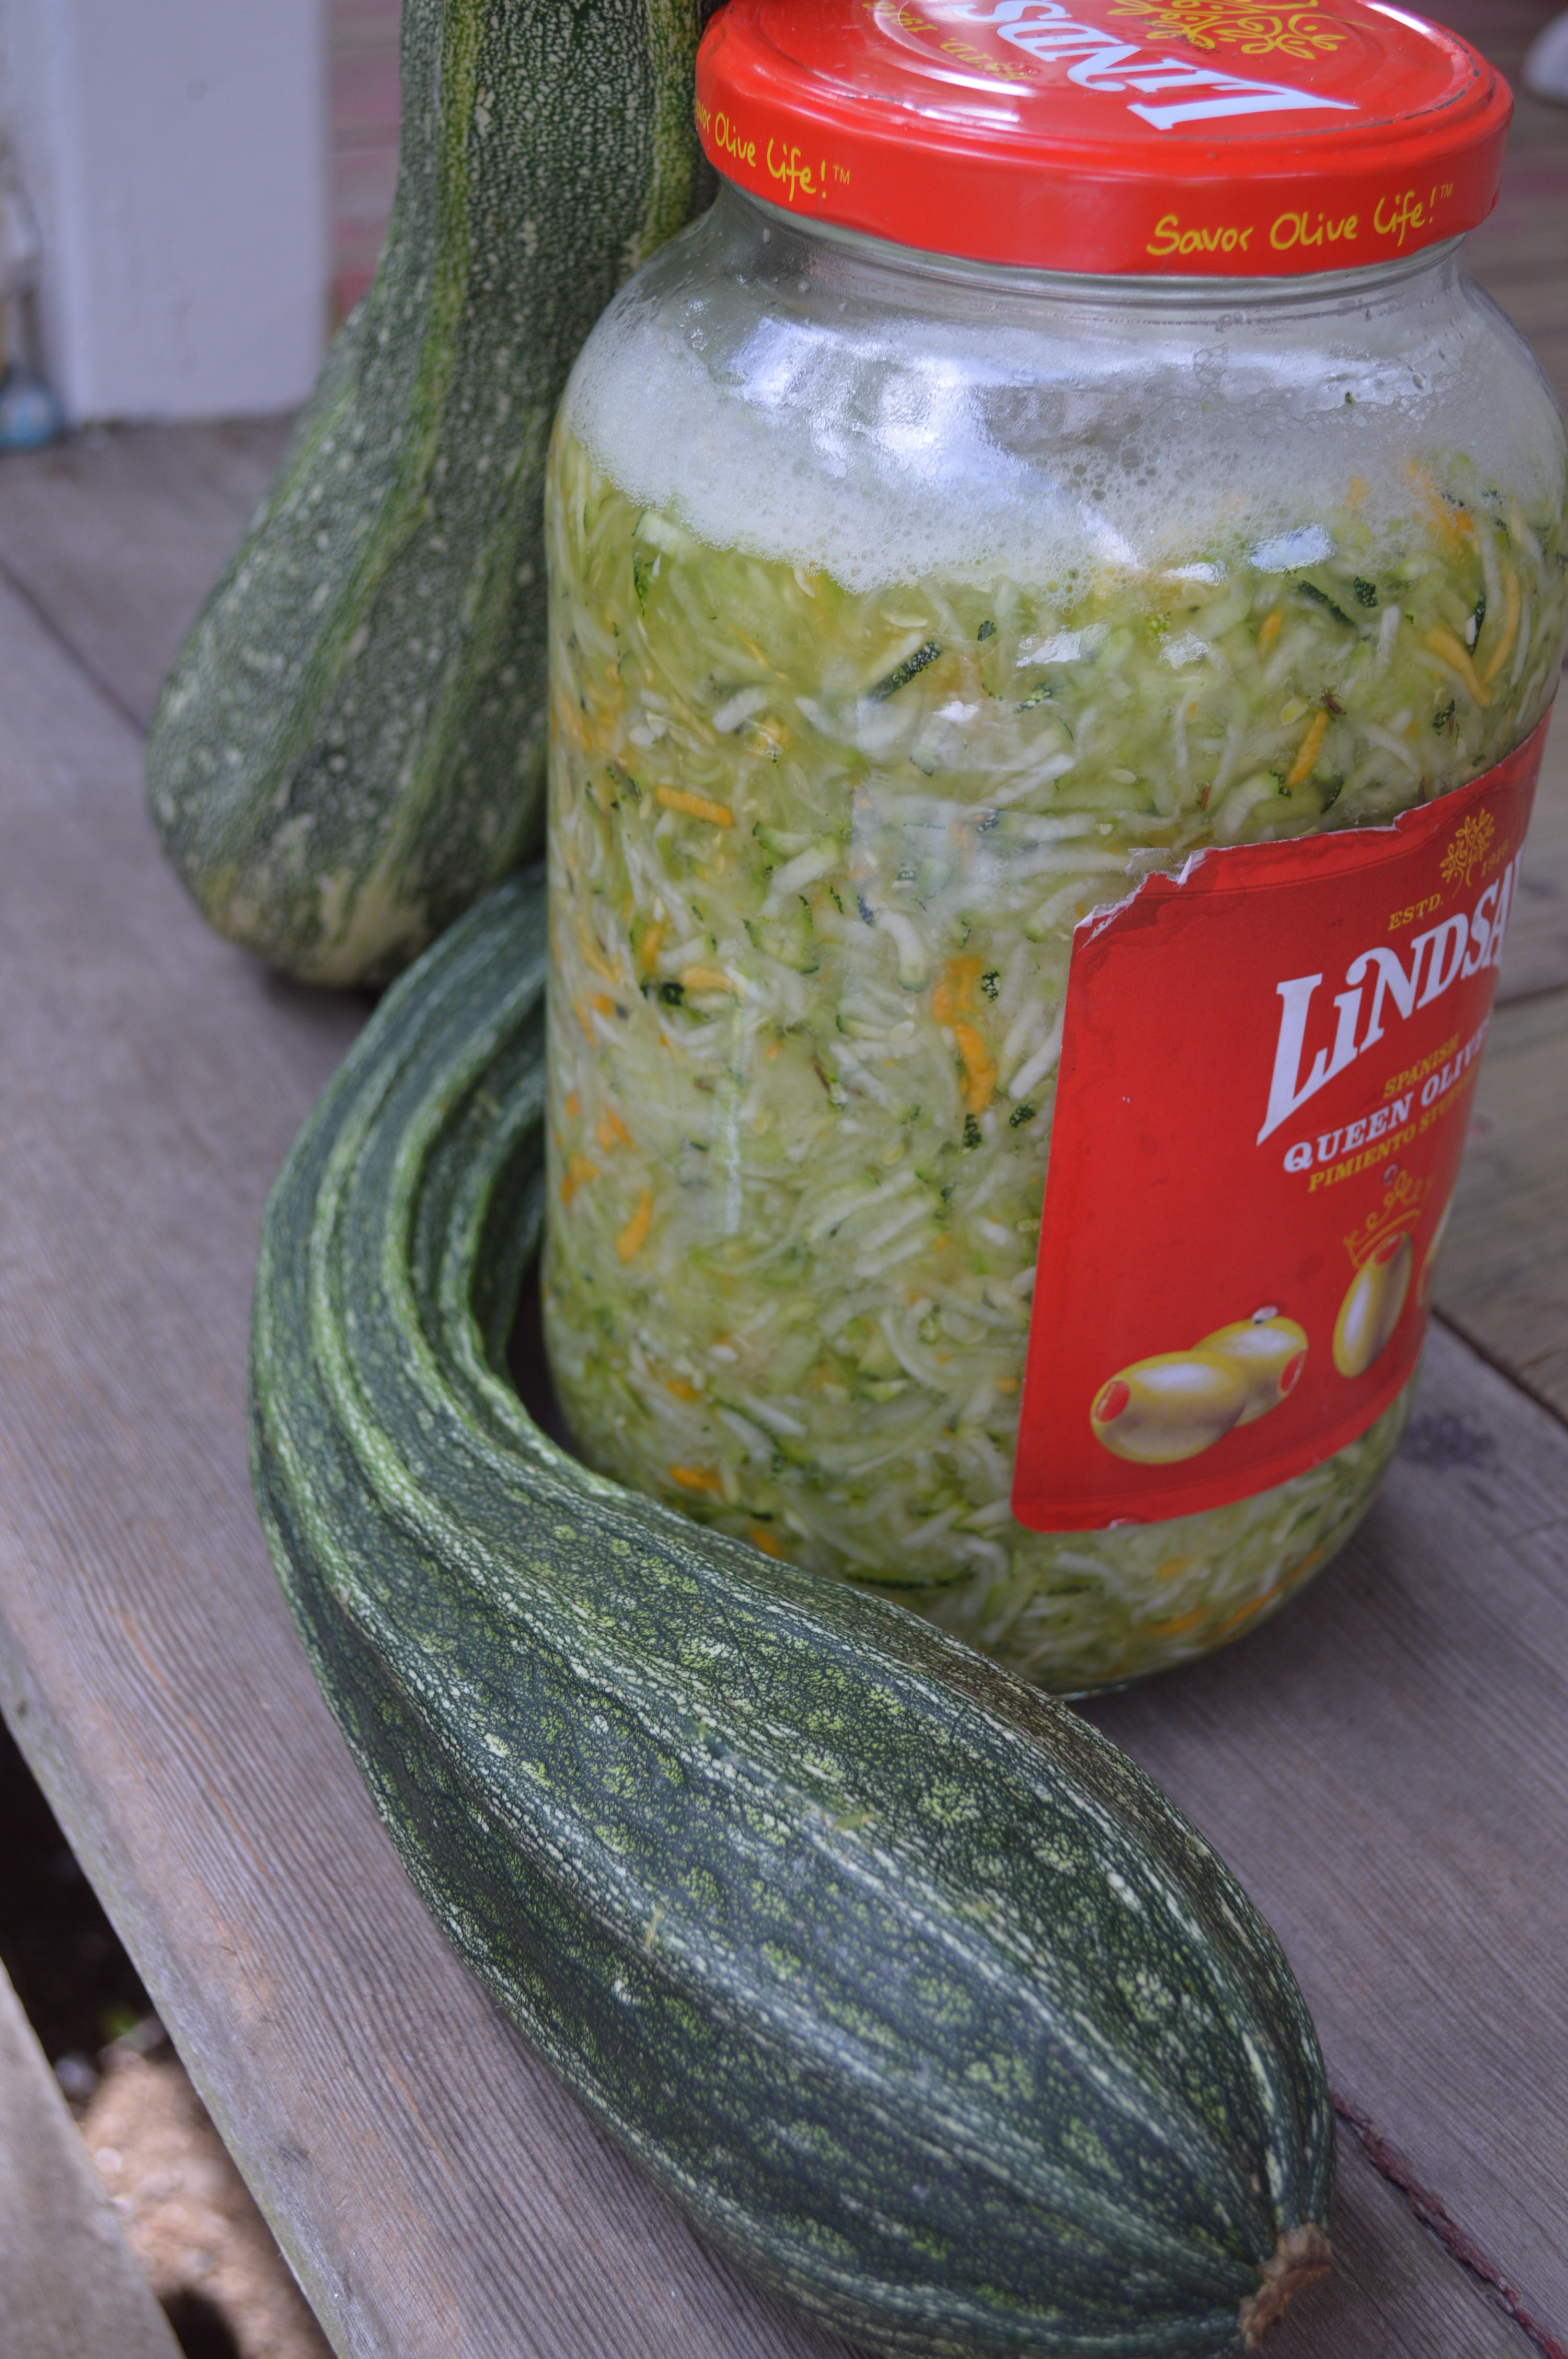
Then I started shredding until I filled the whole container. Then emptied it into the glass bowl. I added about 4 teaspoons of salt, to over a quart of shredded squash, a dash of caraway seed, and minced two garlic cloves. I massaged it all together for about 5 minutes. In that time, the pipinola begins to foam and release liquid. I then loaded the soon to be kraut into jars, leaving an inch of room at the top, and pressing the mixture down firmly. Liquid should cover the kraut. The lid is screwed on, and they were placed one after the next onto a shelf out of the sun.
I could have walked away at that point, but instead, I kept going. I had just bought fresh seaweed, and the orange Habanero were producing, and I cannot make anything without pumpkin, I was skidding into a creative buzz. So I kept going, and trying all kinds of made up combinations. I treated each in the same manner, of packing the solids down, and having enough brine to cover them. I backed off on the salt when adding salt-laden seaweed, I pumped up the garlic and chilis to make a sort of “Squash-chi” kraut kimchi combo.
Each day has begun with my taking five minutes to open them all, release any air pressure that built up, and then smoosh down the solid material so to keep it pressed together, and below the brine line. We are now at day 4, and I have already eaten a pint through my daily sampling, so do make plenty. I have just gifted jar today, and I am sure there will be some requests for trades.
I made a trade today, exchanging my pumpkin for zucchini, I thought that that may be nice to use as well. I picked up some Hawaii grown Sweet onions too. So the day is filled with promise for fermentation, since I still have most of the bushel of Chayote still to go. Overall, it was easy, fun, and I felt like it made a great product out of a rather extraordinary harvest.
These will all be refrigerated in the next week. They will then keep in the fridge for months.

For the Love of Hops
The Beer Garden is the nickname of my small farm parcel. On April 1, 2013 (April Fools Day) I began to soil build. When you know that you are growing a hungry crop, you know that you need to build your nutrients in as part of the plan. So from day 1, spent hops from the award winning Big Island Brewhaus were used to amend the soil. I am doing no-till, so the hops are dug into the growing piles. Much like a 1/4 acre compost heap, it takes some attention and care to see that the soil stays healthy and that your microbes and worms can thrive. People laugh when I say that it is a huge effort to “turn” a 1/4 acre. Remember that each time I turn the farm, my zero-waste principles are at play. Sure, it is easier to rip up plastic ground cloth, roll it into a ball, and drop it into our landfills, then they over till, and spray. That is one strategy, where you may save time there, but in the big picture, you are not saving anything. I do the opposite of that. Each foot will either have a plant growing there, or will be used as a re-rooting place where vines will be buried under the homemade soil and get another hit of nutrients.
Yes, the other method can be done in a day, but your soil is on borrowed time, while mine is surging forward. My labor of hauling and lifting create a nice, rich soil that holds water. In a drought…that is worth gold. So think before we discard. Make connections with these local businesses who would like to help their farmers. Yes “their” farmers. Farmers belong to the community in the best possible way.
Here is a video where I explain a bit more about amending with fermented fish and brewery waste
I always do the warning about hops and dogs…they are poisonous to dogs, so watch your pet. Many dogs have zero interest, but be cautious.

So think about how you can make super soil. This farm is small, but my soil is mighty. Be a steward, and you will be rewarded with a bountiful harvest, reduced pests, and you will be a hero to the kindergartners…and who doesn’t want that?

Hauling Cardboard for Soil Building
Converting the VW to a mini flatbed made it easy and safe to haul soil building materials. Total investment 3 scrap boards and two tie down cords

Cardboard at the Farm…Zero Waste Super Soil
People see me coming and going with lots and lots of cardboard. I get more than a few questions as to why. These videos should sort out my no-till methodology.


Spring Cleaning at the Farm
In mid April, I have my days set on clean up. Pulling grass, pruning chilis and eggplants, and replanting for the seasons ahead. In the ever variable weather conditions of upcountry Hawaii, “now or never” springs to mind. So here I am showing you how my mini kitchen gardens dapple the farm. Though the invasive grass of the area may smother, it also protects the freshly made soil from wind erosion, as well as dehydration from the sun.
So try to think your way through tough situations, like how to deal with a smothering, drought hearty invasive grass that was brought in for the cattle industry, yet smothers the rest of us. You are never going to win in this battle, you can only figure how to work with it’s existing properties. Kikuyu grass exists in Hawaii from 6000 ft elevation on down. It also smothers other places like Australia. Mowing it is one use, but the grass can be used as a living mulch that will retain soil moisture as squash vines crawl on top of it. The grass can make bee pollination difficult, but at the same time, for squash, it can also make it difficult for melon fly and pickle worm to attack your squash plants. There is an upside and usually a downside to just about any farm related matter in Hawaii.
