Tag Archives: Zero waste

Squash Rich Soil Poor

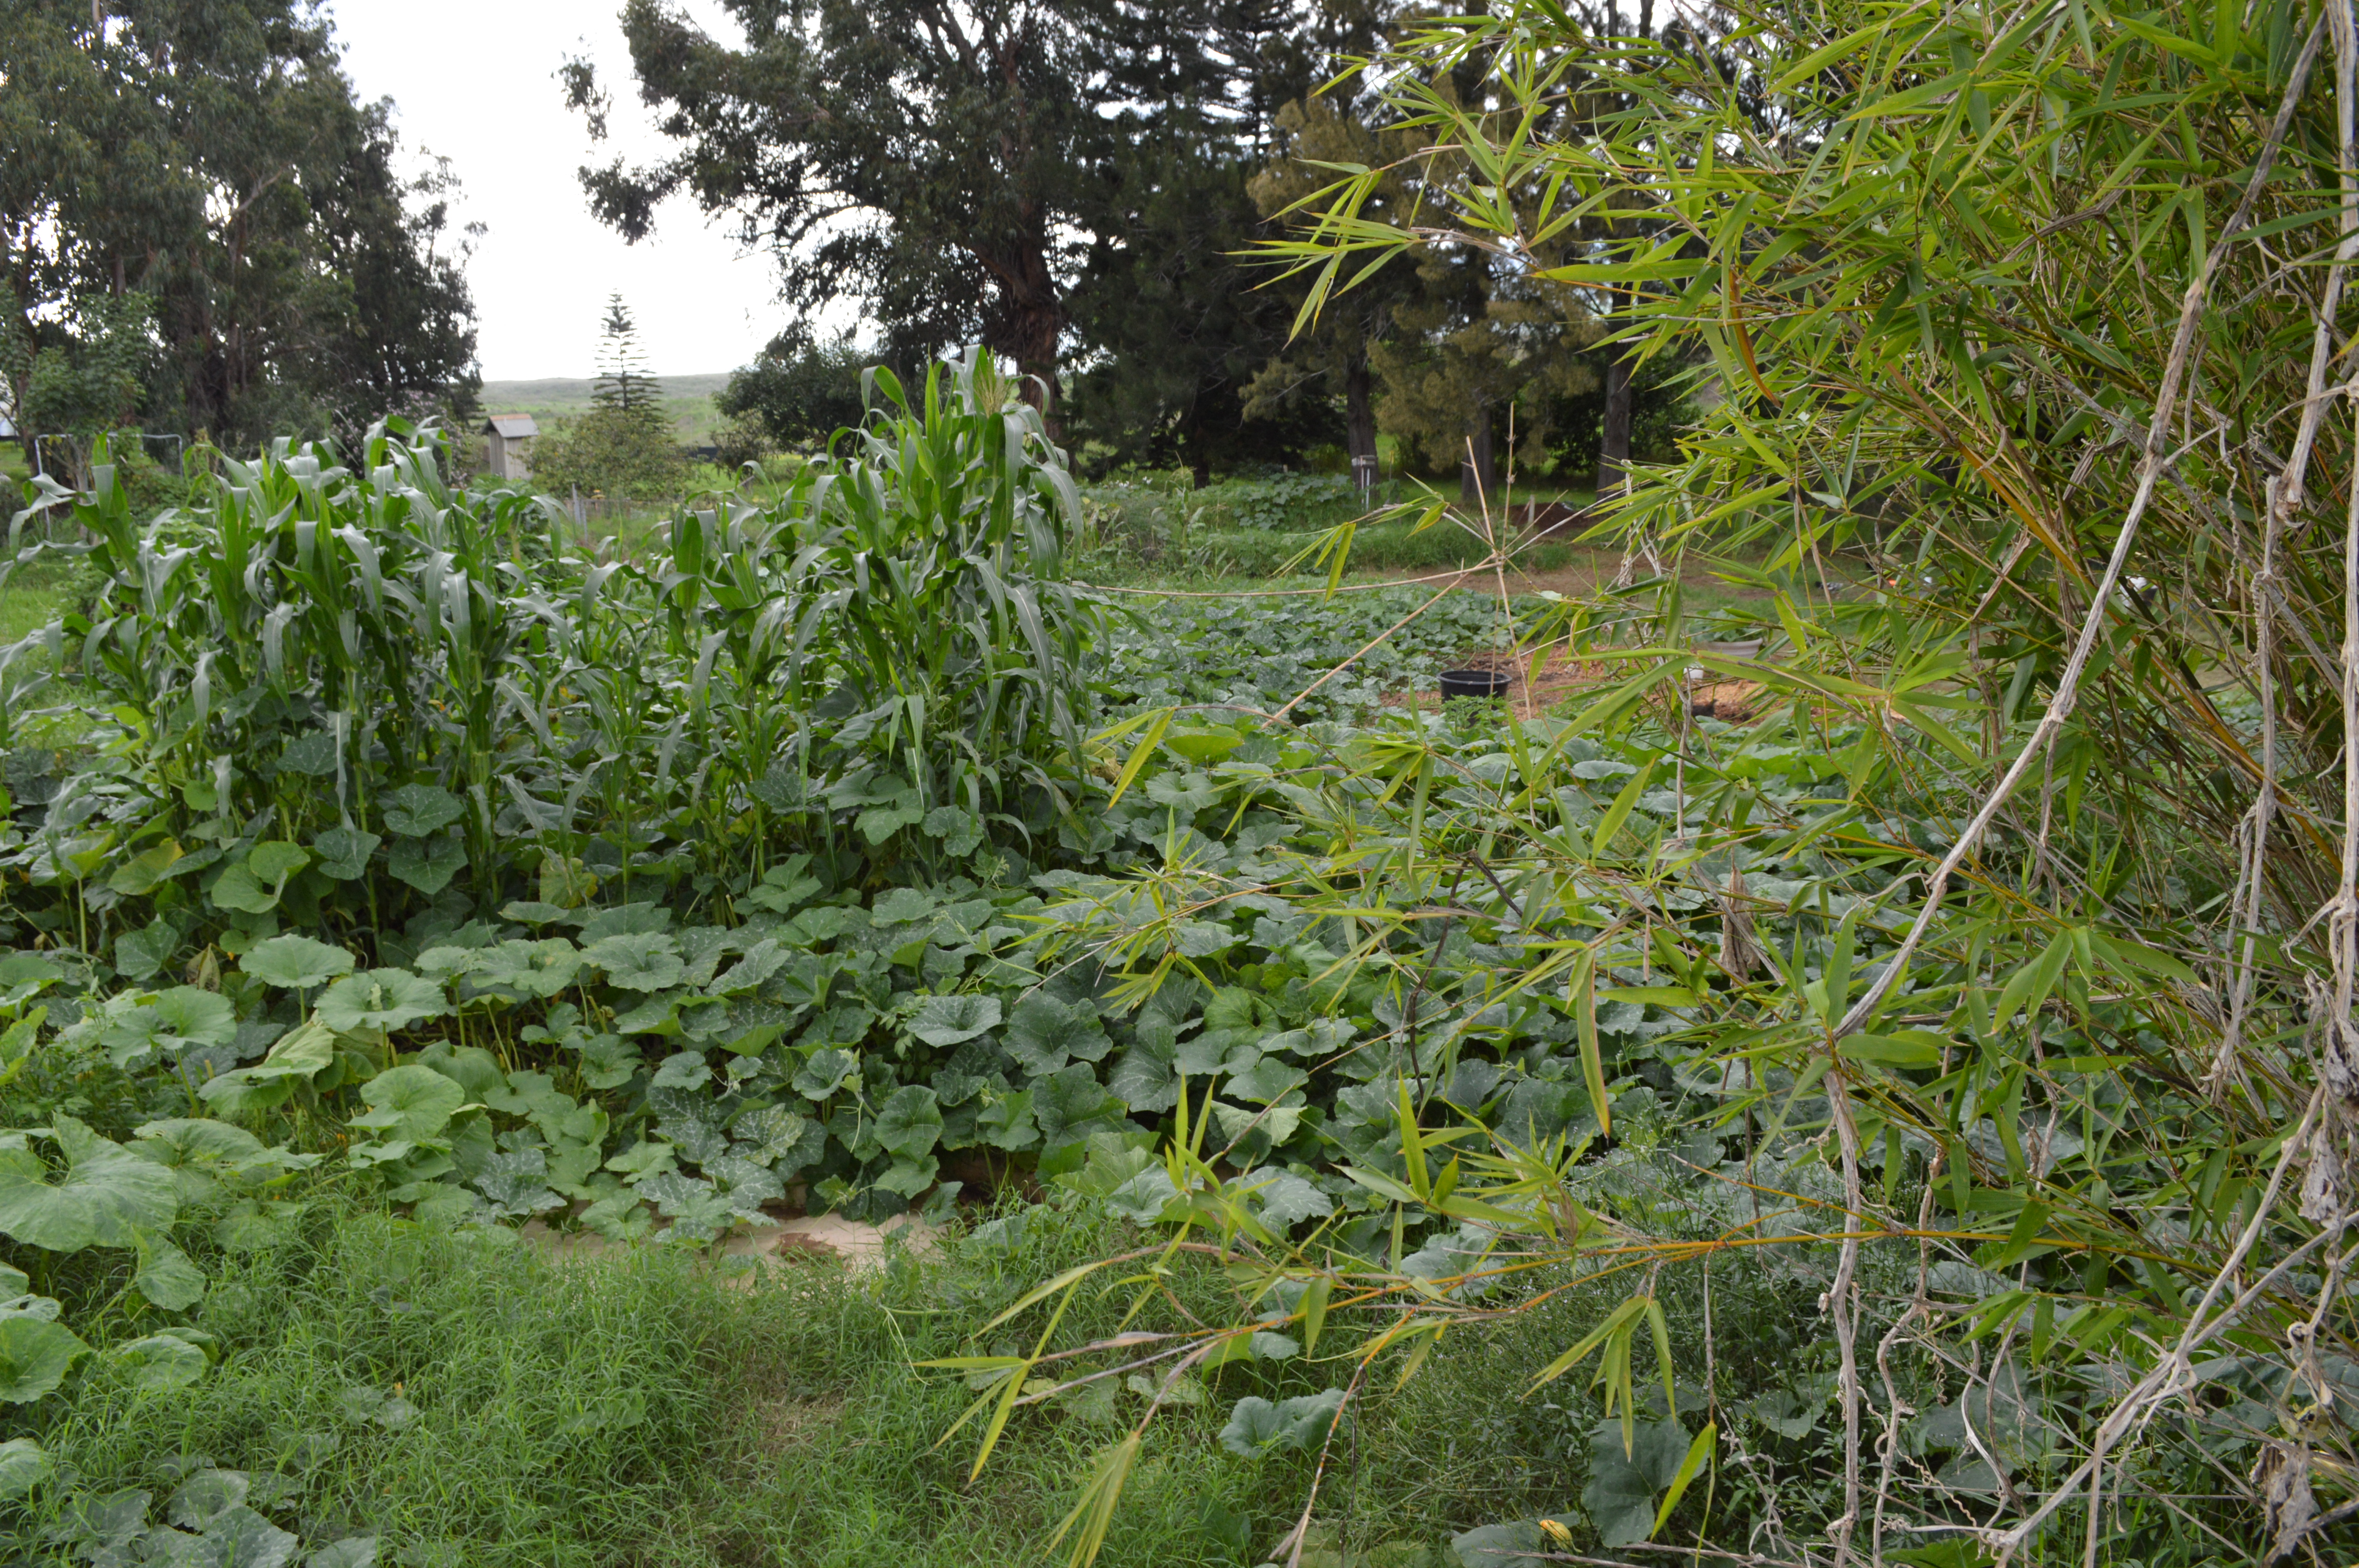
Two years ago, I planted a new area with squash, I was hopeful and optimistic.  It was open, free of the Iron wood trees, but it desperately lacked soil and the area needed serious rehabilitation.  I thought I had given it a good look over, but what I had underestimated was the wind. I was fortunate to have timed my plantings in a year where heavy rains broke the 15+ year drought. The plants thrived.  But then the winds came, and destroyed the raised beds, made irrigation very complicated, while also setting back my optimism.  Those Winter rains were a fluke, and they haven’t returned again.  The wind gusts, on the other hand, have returned with great force, just when you least expect them.  For the last two and a half months it has been blowing, then punctuated by dead calm. As a personal challenge, I decided to rethink that area, and figure out how to do raised beds in a wind gust area while also using minimal irrigation.  I needed to figure out a way to farm rock.

I walked the area with Randy, the AG (mainly pest and plant disease) inspector.  He kicked the ground and noted that they call it the Kau Desert for good reason.  He is facing retirement at a time when farming in Hawaii has hit some pretty hard times.  My projects seemed to offer him hope and a few smiles in is last years as an AG field agent. Farmers often speak of rocky soil, but this isn’t that.  This is rock, period.  100 years ago, and as recent as 50 years back, the Japanese farmers of this area just removed rock day after day.  When I say rock, I should note that they are boulders. They created areas of farmland from this rocky outcropping.  Some areas are now cultivated by tilling methods, some are run as ranchland, and my borrowed parcel is run as no-till.  This Spring I am again facing off with the hardest to farm section of the property.  Here, patches of rock that have been exposed by years of wind erosion, and that hard layer of stone will be under my beds.  Under normal circumstances, you would never plant on top of rock, but this is a test of possibility.  If you can grow there, your system will grow just about anywhere.

The above photo shows what the ground looks like under the new garden system that I am creating.  Roots will not be able to penetrate those stones, so all that they need will have to be delivered through the raised bed system.  The soil that is there is no longer capable of absorbing and retaining water.  But soil has an amazing ability to be transformed back into a condition where it will absorb water. So let’s get to work…what needs to be done?  First think about your wind and wind directions.  Where is it blowing from most of the time?  I am planning on running one simple soaker hose through the base of this bed.  Overhead isn’t going to work like it does in my other patch.  In the main patch, overhead works, because whenever the wind blows, it will blow the water onto a plant, in this area, that isn’t so. Also minimal overhead irrigation works in the other patch because of the tons of soil building materials that were reclaimed and put to work as a living mulch. A technique that works in one area may not work right across the road.  So once you think through your irrigation strategy, think about the movement of the sun.  In Hawaii, you can really notice a difference in the direction of the sun’s rays, season by season.  Lastly, is it in a location where you will be able to check on it easily?  Anytime you are doing a test project, a watchful eye is going to lead you to learning from the experience.

I reused some wire table tops for multiple reasons, I wanted to see if they would:

1)keep the wind from tipping over the stacked design of the beds

2)keep the chickens out

3)create a sturdy base for a trellis

This is what they look like with a variety of squash and edible gourds creeping through.

DSC_1196

Not bad, but it gets better.  Since I have been working to locate and breed heirloom varieties that are disease resistant, I am putting that to the test as well.  Powdery mildew knocks growers flat when they first start growing in Hawaii.  This method of mine would never work without the prior, careful study of natural disease resistance. So in other words, know your plants first.  I am planting absurdly close plantings of all kinds of things: tomatoes, beans, mustard greens, tomatillos, even some flowers.  Most of these I have grown before, but some are new to me heirloom varieties that are getting their “test” here at the farm, such as the Zuni Gold bean that is loved in New Mexico. We see how things turn out for them this year.

DSC_1246

The idea is to create a mini food forest with tier upon tier of food. It is my own interpretation of the “Three Sisters” planting method, combined with another Native American technique that includes burying fish.  I have fermented the fish first, adding much needed microbes to the mix.  My compost scares people.  But I am in Hawaii and we don’t even have compost facilities anywhere near where I live.  I became the compost facility by working with my chef customers. Raw and fermented material is at the bottom, and it will have plants growing above it.

The close plantings will be a “only the strong survive” kinda deal. Plants can “work it out” and find their ways to get enough sun, water and nutrients. So far, they are working together nicely. are two months in. These close plantings also protect from the drying, harsh winds.  These close plantings also create strength in numbers by supporting each other against the gusts.  High winds can snap tomato and tomatillo stalks, even with some trellising.  This will help your system to better take care of itself. Not only will this planting method provide a great variety of foods and beans will add nitrogen to the soil, it is also planted with bees in mind.  Bees area squash growers friend, but unfortunately, they are few in number here where I grow.  So I make a bee buffet of all kinds of blooms.  I plant in harmony with the native Hawaiian plant Ilima and give those small blooming shrubs extra care and nutrition, and they supply lovely blooms to attract our bees.

DSC_1231

Here we see tomatillos growing in harmony with the squash plants.  Those bright yellow blooms will be a beacon to the bees.  Strings run up from the table tops to a simple bamboo trellis that has the ability to shift in the wind.  It has already withstood nearly 20 days of heavy wind, so it has proven itself.  DSC_1247

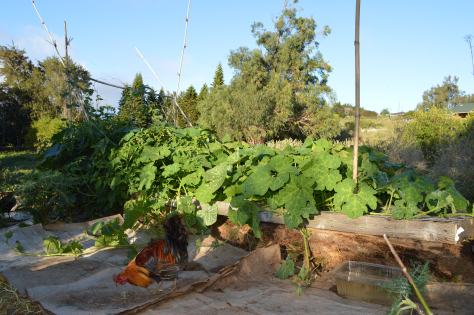
As for the chicken proofing, Hunter is seen here patroling the surrounds while not disturbing the plants themselves.  The chickens and I have all enjoyed their collecting of many harmful to the garden insects.  I should also note that these plants are growing in very raw compost, and all reclaimed materials were used.  This is not something that I advise you to do, but I am doing it as a means to see how fast the restaurant waste can turn to soil.  It can be done with careful planning, and a lot of trial and error.  I will leave that for another post.  So I encourage you into thinking of creative ways to grow your food, create your soil, save our water and nourish our bees.  If this can be grown on rock using restaurant waste, so much is possible.

Picture Perfect Pumpkins

I frequently reference putting a small block of untreated lumber under your pumpkins and Winter Squash.  Many people note that they do not have the time to do so, but also note that wet weather and bugs caused their squash to rot in the field.  I recommend making the time to protect your pumpkins with a little extra care. The way I look at it, by increasing your yield through the reduction of waste, you are saving time.  I took these photos (below) to give people an idea of what squash that have remained in contact with the ground all season can look like, especially here in Hawaii.  Keep in mind that in Hawaii, many of the Winter squash and kabocha that do well here take more than 110 days.  Often more than 120 days until harvest.  Somewhere in there, as the fruit sets,  try to make time to “block” your fruits by lifting them off the ground with a scrap piece of wood. The scrap wood only needs to be 4″x 4″ or so.  Once you have the wood blocks, you can use them over and over for years. I keep them in small stacks near the edge of the patch. It does take some getting used to, but it helps to safeguard from rot that can occur due to surface moisture as well as insects that can damage the surface of your squash.

The above featured squash shows what damage can occur.  Luckily, the harvest occurred before it caused the pumpkin to degrade on the inside.  Since I caught this while it was simply a surface issue, I happily made it into my beloved squash curry for myself.  This could have easily gone deeper into the pumpkin and caused the entire fruit to be lost.

With the way I farm, there is no true “loss” because the damaged squash can become nutritious pet food, chicken food, and rich soil building materials.  But when you farm small, you need to think smart and safeguard what you grow.  Some squash simply drop from the vine, and others may only half develop due to incomplete pollination by bees at flowering.  These things happen, and it is just simply part of the natural cycle of things.  What you can do, is give a little extra tlc to the fruits, and you will be rewarded with picture perfect produce that inspire chefs to put them on display before heading into the kitchen. One chef that I will not name, has been seen giving a slight hug to the squash as they enter his kitchen domain. Huggable produce is good produce.

This extra step in protecting the skin of your  squash will probably add an overall awareness by creating an intimacy with your farm as well.  You can tell a lot from how your squash are flowering and fruiting. A watchful farmer can see signs of insects, powdery mildew, the need for some fish fertilizer, pruning, and more, by stepping carefully into the vines.  These preventative observations can really make the difference in having a successful season. So while you are inspecting your fruits, give them a boost.  You will be rewarded at harvest time.

The Fermented Farm: Beer Traps

People ask me what school of farming I use.  There are a lot of groups to choose from:  organic, no-till, Hawaiian natural farming, Korean natural farming, biodynamic, intensive, permaculture…the list goes on and on.  I use elements of all of those, and I have adapted them to the particular situation I have, and my situation is one of ever changing conditions.  If there is any one thread that continues through all aspects of my farming, it is microbes.  Today, I am going to share one of the ways fermentation is part of my farming practice.  Beer!  Yes simple as it may seem, the humble dregs of beer kegs, and other cast away remains of beer gets used in my farming as beer traps.

A beer trap is my way of capturing the insects, slugs, and snails that would otherwise damage newly planted seeds, and seedlings.  It is a highly effective way of trapping them before you plant your seeds or seedlings, as well as during your growing season. I trap before I plant.  People often think that in the dry upcountry, we don’t have slugs and snails, but we do.  When you add a little moisture to the plot, every single slug or snail will be drawn to that parcel.  By simply taking reclaimed cups, saucers, trays, plastic tubs, and the like, and putting an inch or more of beer in the bottom, you will have a very effective way of removing the pests from your field.  My strategy is to place traps near new plots of seedlings, depending on the time of year, I will catch a wide variety of the bugs that would lessen my productivity.

DSC_0693

Above are two small traps that will be put out today.  With this small amount of beer, you will be surprised what shows up in there.  I can add some water to top off the traps.  Each day the beer trap will have a riper aroma, making it even more tempting as bait.  To increase your success, you can burry the traps so that they are nearly flush with your soil, you can make them larger, deeper, out of different materials, but the basic idea remains the same.  Trap before you plant and you will see results.


Preparing for Rough Weather

In the days leading up to Thanksgiving, I am getting more calm as the rest of the country gets revved up.  It is my extra busy time from October 1-Thanksgiving.  It is the time of year when squash/pumpkin production isn’t terribly high in Hawaii, but the demand suddenly is.  It is also the time when we all want to think in terms of comfort food, pumpkin patches and family gatherings.  But with a tough Summer behind us, I am grateful that my preventative steps helped in the patch.

October was an intense month where some days, all I could do was just continue to believe that my actions would prevail, and the harvest would come.  It did.  The Summer was a sluggish season where Winter rains came in June.  There was flooding when there should have been long hot days.  Many farmers felt like disappointments, when really, it was one of the toughest seasons all across the country.  Even in the darker moments, when the seasons flip, and hurricanes come one after the next, I always feel that there is something that you can do.  The weather is not your fault, but we need to continue to search for ways to minimize loss.

I got a call from more than one farm across the state that noted that their pumpkins were rotting on the ground.  My answer was simple:  get them up off the ground.  For many this seemed like a time consuming act, but for me, loosing your entire crop isn’t an option.  I recommend that as the pumpkins fruit, take a piece of untreated lumber and slip it under the fruit.  It will cause the sow bugs/rollie pollies to go under the wood rather than destroy the skin of your squash.  It will also keep the squash from sitting on wet ground, and reduce the likelihood of rot.  I have had many people say how time consuming it is, so here is my method and maybe it can work for you.  Keep stacks of scrap wood at intervals near the edge of your patch.  As they fruit, carry a few squares of wood under your arm, and slip them under the new fruits as you see them.  This time of year, squash in Hawaii is just starting to take off, but Winter rains are also heading our way.  It is a great practice that has allowed me to loose no fruits to ground rot.  It also keeps the skin display perfect, while you are making a mental note of which of your vines are producing.

The pumpkins may roll off the blocks as they grow.  I simply check on them once in a while and replace them or add a second block if the squash is a really large one.  After harvesting, the block gets collected, dried in the sun and used again for another squash.  Try it out and see how it works for you.  You never know what the weather is going to bring, and this way, you are ready.  You can still “block” the fruits even mid or late season.  You can even do it when the field is flooding.  Any action, no matter how late, is better than none.

Fixing at the Farm: jacking the delivery car and replacing muffler clamps

Keeping the farm up and running often means keeping the delivery cars up and running as well.  It has been a rough month of wear and tear on both me and the cars.  Lots of go go go with all of the pumpkin outreach.  So something was bound to fail, and two things did.  First, my rear drum on the hub worked it’s way loose, creating an annoying squeak squeak squeak sound that could have led to an expensive replacement if it continued long enough to destroy the splines on the axle.  That is all repaired now, so the next thing was the muffler clamp rusted out completely. In doing so, the muffler pipe came out and created an exciting, though annoying to others, muffler sound.

So first, let’s jack the car.  What to know:   Safety!!!! Don’t even start without a floor jack, two jack stands and safety goggles.  DSC_0121 Know the rating of the equipment and of the vehicle you are jacking.  This floor jack is rated to 4000lbs, and the stands to two tons.  The car weighs less than two tons…that is the key.  Vehicle must weigh less than the numbers on your jack equipment.  Don’t know the weight of your vehicle?  Look up the year and model online, or in the manual, or in my case, inside of the door.   For this simple muffler repair, three tires are on the ground, with a wooden block on front and back of one of the wheels that is touching the ground. Next, after jacking off the solid frame, the jack stands are placed at two other nearby locations on the car as a back up.  This will seem way over the top for many, as the car is barely “up” off the ground, but it is better safe than sorry.  Next, safety goggles on…and off the top of your head.  Then once the car is jacked and secured, hit the old rusted muffler clamp with a mallet a few times to loosen, then apply penetrating liquid of your choice.  Let it sit a bit, then take two wrenches that are the same size, one top, one bottom and “break” the rusted hold of the bolt. The top wrench will hold the top of the bolt in place, while the bottom wrench will be put on the bottom of the bolt and you will push the wrench clockwise, while the upper wrench is pushed in a counter clockwise position.  This is breaking free the bolt so that they can be removed from the muffler pipe.  Mine came apart in a pile of rusted bits.  Without the safety glasses, this could have gotten in my eyes.  Make sure you have the new clamp of the right size first.

A small repair, but it keeps the car on the road, and deliveries right on schedule…without waking the neighborhood!  Here is a mini video to go through some of the above.  Good luck, and never go under a car without multiple safety points jacked and secured!

Error
This video doesn’t exist

as always, my video cuts out (LOL) but you get the idea.

the pieces for my VW A closer look at the replacement clamp.  Note the two circular parts that need to be put around the smaller pipe prior to clamping the lot together.  The top of the clamp is at left.  It is considered the top, only because that makes it easier to screw on the nuts from the bottom.  Here is how it would look like as you are piecing it together…

the finished result and this is with the two circular pieces, and the two part clamp cinched down over where one pipe was inserted into the other.  You could use three hands, but by assembling one side of the clamp prior to pushing the pipes together, it makes it much easier.  Then two wrenches again, one holding the bolt from spinning at top, then the other wrench tightens the bottom nut.  I went back and forth and tightened each one so to tighten evenly.  Then the real test…start the engine and listen for what the muffler sounds like… then joy ride to follow!  Yes you can do this one….Good luck aspiring gear heads!

Farm Clean up: the no-till way

In the frantic days before I leave for California, I needed to put some serious order into the farm. I will be going to help harvest the Baker Creek pumpkin seed trails,  and just a couple weeks later, I will be giving my speech at the National Heirloom Expo.  The excitement is building, because one of my very own farm pumpkins is a part of the trials.  I’ve worked hard so to stabilize the variety.  I am hoping that when I get there, it will be shining in the sun, and offering resistance to the drought there.  But for now, I need to focus on getting my own crop in order.  Pumpkin growers frequently count the days when you need to hit your harvest right on schedule for October, and we in tropical and subtropical places need to look 120 days out, and sometimes more.

Hawaii’s high season also creeping closer, where the demand doubles. So,  it is simply now or never.  This year is a big soil building year, as well as planting all new pumpkin vines.  It has been a long summer with quite unexpected weather patterns.  We had Winter-like weather for weeks, including flooding, and now it is like Summer again.  Adaptability is the name of the game.

The soil strategy is working.  I have brought in several tons of hops, mixed them with wood chips from the farm, then piled them on top on salvaged cardboard.  The trick is to turn the piles, carefully, letting them air out in all this heavy rain.  For those of you just tuning in.  In the farmlots, we got several days of flooding after 17 years of drought.  Quite a change, but not entirely a surprise.  Why?  The drought/flood cycle goes together, like it or not.  You cannot change the weather, but you can change your soil’s ability to adapt to changing weather.  Adding soil structure through organic mulch materials, and valuable nutrients both help.  This improvement to soil health also encourages the earthworm, and microbes…and on we go.

People are often overly concerned about how no-till looks, but really, it doesn’t matter how it looks, what matters is how is responds to the needs of your plants.  We need to get over our thinking that everything needs to be in tidy rows, with nice big parched earthen walkways between.  We are in a drought, and there is a lot more drought coming our way.  By planting very close in super homemade soil, the healthy plants adapt and even help one another.  I seed select only from varieties that are naturally resistant to powdery mildew (a huge problem in Hawaii) and then I can just let the vines sprawl, without worrying about close planted plants and powdery mildew.  What people usually do not see, but you can in these images, is the under story of the mulch.  Ever wonder why I have giant green squash leaves the size of platters?  It is because I have created a natural fertilizer system on which they grow.  When water hits a vine, it encourages it to re-root where the vine touches the soil, or in this case, where the vine touches the nutrient mulch.  I can encourage growth by burying the vine, (like giant pumpkin growers do) and encouraging more roots to form and uptake more nutrients.  This system is why I get so many tons out of a tiny parcel.  A squash plant often produces 2-3 pumpkins, mine may produce 10 times that, because I feed and prune and feed some more.  They are spoiled with love.

Here is a look at the mulch before the vines cover the lot.  The system is as follows:  cardboard, hops and wood chips mixed, some coral sand, coffee grounds, and fermented fish (buried in holes here and there.) Throughout the season, I will feed again with homemade fish emulsion, and top dress with more coffee grounds.  Then too, I will add some EM-1 soil microbes fermented in grain to the field.  Most of soil making is being done below those sprawling vines.  Compost materials are the mulch.  Soil is the solution.

the farm in year 3

Creating a U Pick Tomato Garden for the Poultry

Tired of the poultry eyeing the tomatoes?  How about designing a garden with them in mind.  They like a diverse selection of healthy foods, just like us, so why not let them collect the low hanging fruit.  Let me explain…

DSC_1072

These now aged shipping pallet beds were created in the chicken area, which could be a recipe for disaster, unless you think of all parties in your design.  Wild chickens are all around in Hawaii, so everyone thinks about how to keep them out, but few think in terms of working with them in the garden.  The pallet garden was the perfect place to plant a sprawling wild type cherry tomato.  Dime sized and quite acidic, they make a great cooking tomato, tossed by the handful into curries, stir fry, sauce.  They are easy to grow and resist mildews.  Prolific enough to share with the barnyard.

DSC_1074

The pallets are 4′ tall, so that leaves that entire length of a drop for tomato, and in this case, Mexican Oregano plants also drape the sides of the pallets.  This creates a shaded, edible environment, that also gives some protection from the heavy rains that flooded the area just a few days ago.  In the photo above, Indigo  surveys the area for ripe tomatoes that are at “chicken level.”  The ones at the top, are harvested for human consumption, and the ones near the ground become a U pick for the pig and the chickens.  The bonus is that they are constantly looking for tomatoes, and in the process, they find all of the snails and slugs and get them too.

Red gets a tomato

Here Red walks the “tomato zone” to see if she missed any.  She is just coming through a long molt, so she is happy to be out of the coop and strutting her stuff with the others.

Indigo

Indigo, the neighborhood rooster enjoys showing the hens the fallen tomatoes after the storm.  Everyone wins, everyone gets a share.

For the Love of Hops

The Beer Garden is the nickname of my small farm parcel.  On April 1, 2013 (April Fools Day) I began to soil build.  When you know that you are growing a hungry crop, you know that you need to build your nutrients in as part of the plan.  So from day 1, spent hops from the award winning Big Island Brewhaus were used to amend the soil.  I am doing no-till, so the hops are dug into the growing piles.  Much like a 1/4 acre compost heap, it takes some attention and care to see that the soil stays healthy and that your microbes and worms can thrive.  People laugh when I say that it is a huge effort to “turn” a 1/4 acre.  Remember that each time I turn the farm, my zero-waste principles are at play.  Sure, it is easier to rip up plastic ground cloth, roll it into a ball, and drop it into our landfills, then they over till, and spray. That is one strategy, where you may save time there, but in the big picture, you are not saving anything. I do the opposite of that.  Each foot will either have a plant growing there, or will be used as a re-rooting place where vines will be buried under the homemade soil and get another hit of nutrients.

Yes, the other method can be done in a day, but your soil is on borrowed time, while mine is surging forward.  My labor of hauling and lifting create a nice, rich soil that holds water.  In a drought…that is worth gold.  So think before we discard.  Make connections with these local businesses who would like to help their farmers.  Yes “their” farmers.  Farmers belong to the community in the best possible way.

Here is a video where I explain a bit more about amending with fermented fish and brewery waste

I always do the warning about hops and dogs…they are poisonous to dogs, so watch your pet.  Many dogs have zero interest, but be cautious.

The image says it all.  The additions have changed the soil dramatically.
The image says it all. The additions have changed the soil dramatically.

So think about how you can make super soil.  This farm is small, but my soil is mighty.  Be a steward, and you will be rewarded with a bountiful harvest, reduced pests, and you will be a hero to the kindergartners…and who doesn’t want that?