People ask me what school of farming I use. There are a lot of groups to choose from: organic, no-till, Hawaiian natural farming, Korean natural farming, biodynamic, intensive, permaculture…the list goes on and on. I use elements of all of those, and I have adapted them to the particular situation I have, and my situation is one of ever changing conditions. If there is any one thread that continues through all aspects of my farming, it is microbes. Today, I am going to share one of the ways fermentation is part of my farming practice. Beer! Yes simple as it may seem, the humble dregs of beer kegs, and other cast away remains of beer gets used in my farming as beer traps.
A beer trap is my way of capturing the insects, slugs, and snails that would otherwise damage newly planted seeds, and seedlings. It is a highly effective way of trapping them before you plant your seeds or seedlings, as well as during your growing season. I trap before I plant. People often think that in the dry upcountry, we don’t have slugs and snails, but we do. When you add a little moisture to the plot, every single slug or snail will be drawn to that parcel. By simply taking reclaimed cups, saucers, trays, plastic tubs, and the like, and putting an inch or more of beer in the bottom, you will have a very effective way of removing the pests from your field. My strategy is to place traps near new plots of seedlings, depending on the time of year, I will catch a wide variety of the bugs that would lessen my productivity.
Above are two small traps that will be put out today. With this small amount of beer, you will be surprised what shows up in there. I can add some water to top off the traps. Each day the beer trap will have a riper aroma, making it even more tempting as bait. To increase your success, you can burry the traps so that they are nearly flush with your soil, you can make them larger, deeper, out of different materials, but the basic idea remains the same. Trap before you plant and you will see results.
I began fermenting back in July as a means of finding even more uses for the vegetables that I grow. In the past six months, I have continued to explore ways that fermentation can be good for me, my farm, other farmers, and the entire community. It continues to be a journey of discovering new things with each new ferment.
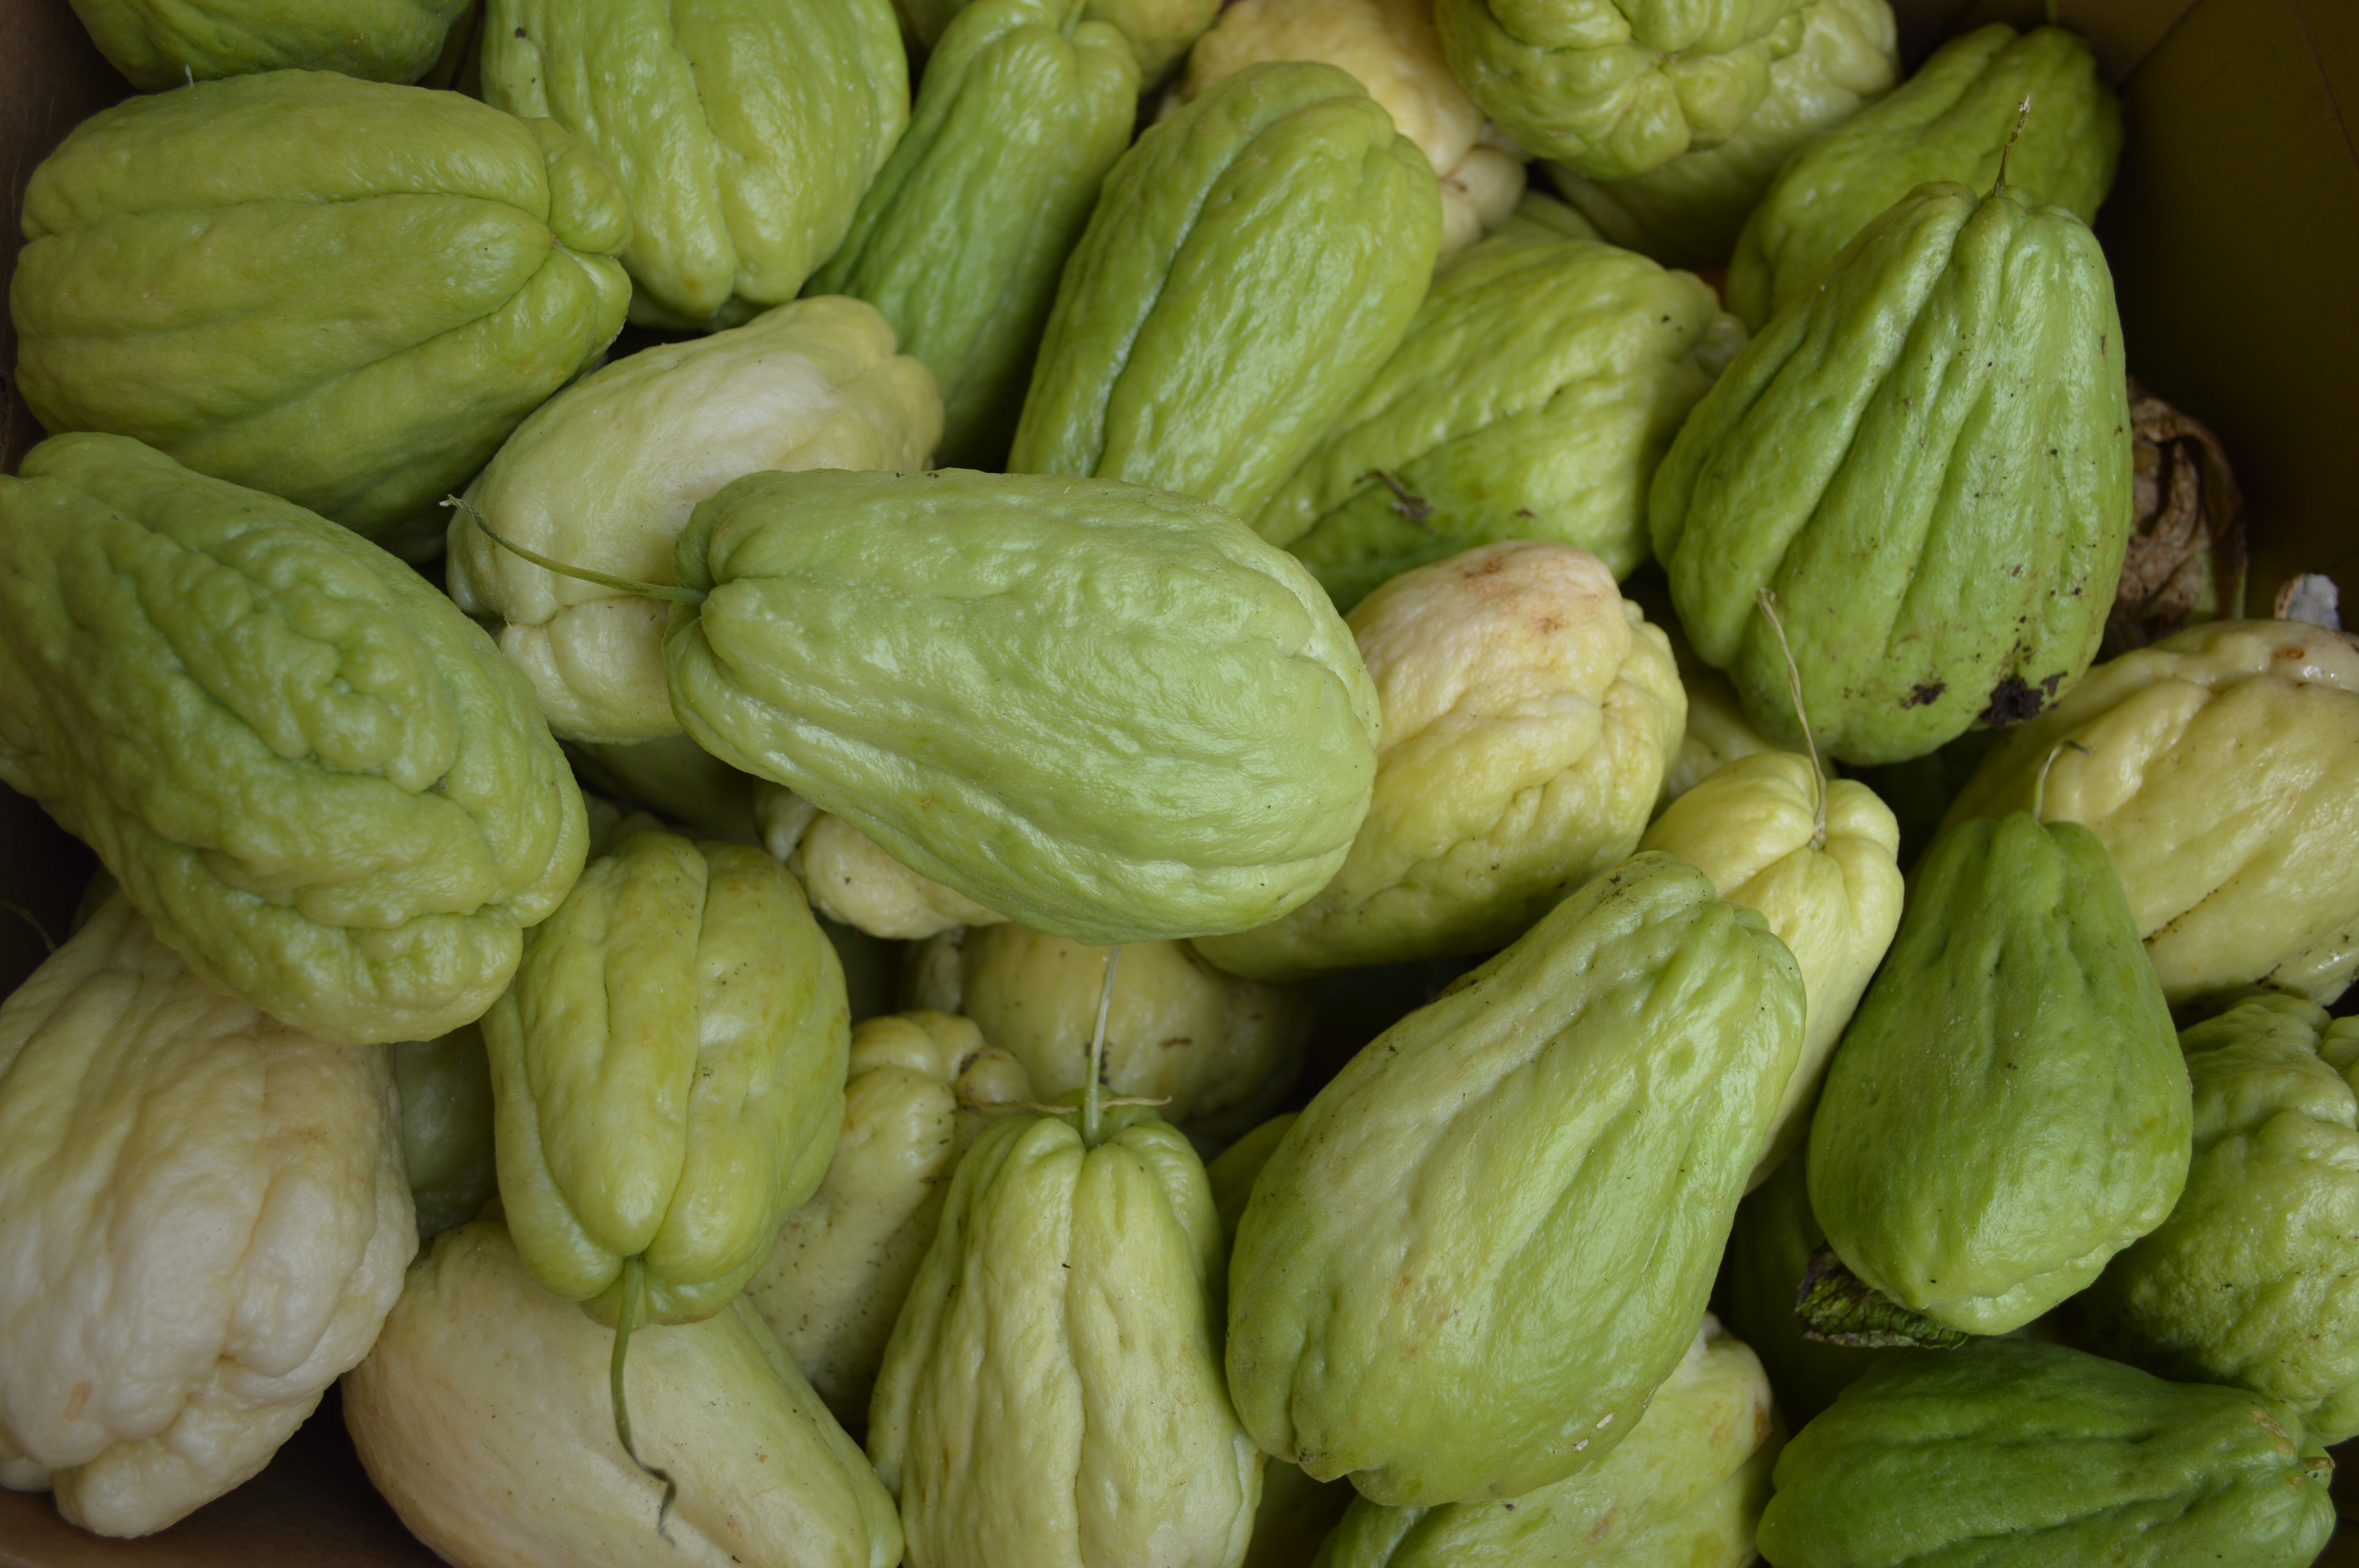
This past week I decided to continue to work with other farmers and their abundance. It turns out that my quarts of fermented produce have become a wonderful item to barter with. Squash is the core of all I do, so squash is also the core foundation of my fermentation. I have experimented with two varieties of winter squash, one variety of summer squash from my fellow farmer Lark, and pipinola. Pipinola is what I consider a cousin of squash. We have a unique name for it here in Hawaii, but it is more commonly known as chayote.
I have previously sung the wonders of pipinola on my webpage, but I would like to add that it is a good source of vitamin C. Raw chayote it crunchy, and crisp, which are two great things for fermentation. It is also quite neutral in flavor and color, making it my fill in for cabbage. It also releases water quite easily when salt is added.
I began my pipinola growing with green skinned heavily wrinkled fruits. I found a variation that I liked which was a smoother, softer skinned fruit. I selected these traits and gradually replanted the fruits that displayed this smooth skin. Like any variation there are upsides and downsides. The smoother, softer skin, makes the skin easily used in the kitchen instead of the tougher skinned ones. The downside, is that they are much more susceptible to damage through bruising and nicks. Pipinola/chayote is grown by replanting the fruits, and the one large seed within will germinate with a dynamic vine.
One you have your fermentation base vegetables, it is great to explore how new combinations can change it all up. So this week, I investigated how other farm goods can be brought into the mix. I have always loved root vegetables which are not easy to grow where I am farming. Beets have come into season again here in Hawaii, so it was time to revisit the Bonk family and get my hands on some beets. Marlene was happy to take a quart of pumpkin/carrot/pipinola kraut, while I was excited to fill my bag with beets.
With each new vegetable, I create a series of ferments that are linked by that one new flavor. If we were talking fashion design, my ferments would be a collection, so I will refer to them as such. In the beet collection, I decided to marry the sweet with the heat of ghost peppers in another, as featured above, I threw it all in.
Each of us will like different combinations of vegetables, and as is the case with fermentation, you may like some fermented vegetables, that you do not like unfermented. Fermentation transforms, melds, marries flavors into a complex profile. So with the new addition of beets, we can look at how they shape the ferment in terms of nutrition, flavor, and color. There is also the need to consider what is the limit of how much beet we can handle? When is it enough? Experiment so to know the limitations of your ferments. I love seaweed, known here as limu, but there is a point where enough is enough. To much limu can make the ferment very salty, and very intense in minerals. It can pack a punch and “kinda levels” those not used to it. I feel like beet could go the same route, in being an overpowering vegetable, where you need to understand how to use it as an accent, in a combination of flavors, and as a main flavor. As is the story of fermentation, time will tell. Longer fermentation time may make it mellow…or not.
Above, locally sourced Ogo seaweed is busy making my ferments both intense and complex.
Repurposing found objects is also a great way to begin in fermenting. I chose to repurpose a 4 qt crock pot crock and found a lid that would work with it. Most of my ferments are done in one quart jars, but I decided to try a larger quantity of the “kitchen sink” ferment. Quart jars were used for smaller volume experiments.
I’ll be keeping you posted on how the new farm ferment collection turns out, but until then, think in terms of abundance in your garden, your cellar, your farmers market, and region. Abundance is a luxury as long as you do not allow it to overwhelm you. Too much of a good thing can be stressful, and putting up a bushel of vegetables on your own, is quite a task. I can honestly tell you that it does get easier to work your way through a volume of produce. I think starting with what would roughly fit in a grocery bag is a good place to start. So give it a try…and good luck!
I decided to cook up some of my heirloom Christmas lima beans and make a casserole. With a lot of work to do in preparation for the National Heirloom Expo, I need my energy. I had the food processor out with the shred blade on, as I was already making my pipinola (chayote) kraut. I was also sitting on several pounds of zucchini from a farm trade that I made with our local CSA. I decided to just keep shredding and make a taco seasoned dish that I could use throughout the week. Here is what I did: I had cooked the Christmas lima beans on low overnight in the crockpot with water enough to cover, and 1/2 of a Sweet Onion. I was already planning on using the beans, so I thought that all I needed was some more vegetables.I shredded one half of a large Hawaiian Sweet Onion, One large Zucchini, one pipinola(chayote squash) 2 orange habanero peppers, and 5 pickled hot peppers. I then poured the shredded veg into a bowl, and pulsed 2-3 cups of the now room temperature cooked lima beans. I added them to the bowl, and added two packages of taco seasoning, a sprinkle of sea salt, and a cup of breadcrumbs. I mixed it all together and pressed it into a 9×9 square pan, baking it at 350 degrees for an hour.
I’ve been making homemade kraut for several weeks now, as a means of capturing the harvests that come and go at both the farm and garden. The salty zing of the sea salt brine is welcomed after a hot day in the field. I thought, why not? Add it to the taco. I am happy to learn that this one taco casserole makes two completely different dining experiences. Fresh out of the oven, it is warm and comforting, with melted cheese and steamed rice for an evening meal, but the next day, it is bright and light as a chilled lunchtime taco with the ice cold kraut.
Since I am doing a lot of physical labor, I need a lot of food energy to get me through the day, so this homegrown, healthy taco had enough staying power to keep me going. Granted, my farmer portion was probably a bit larger than many would make. Overall, it was a simple feast made out of farm and garden goods. I will certainly make it again soon.
Try experimenting, I am sure carrots or pumpkin would be equally nice additions to the taco. Just think in terms of a meat loaf minus the meat. You can add two beaten eggs to the mix as well, or add chopped boiled eggs if you are a hungry one like me. As for the kraut, I have made a wide variety of them in my initial experimentation. It is all based around what is in arms reach. I have a few chili peppers producing now, and I always keep fennel fronds near. Though I am not a seaweed (limu) collector, I support those few that do here in Hawaii. I have been using seaweed as the majority of the salt in the recipe, topping off jars with just a bit more salt for fermentation. If you haven’t read it, you may enjoy my earlier post on my summer fermentation trials with pipinola (chayote)
For those growing in Hawaii, we know Pipinola, also known as Chayote, but we may not know what to do with it. This squash relative is a big climber, which can be a blessing, or not so much, depending on where it is growing. Edible from the chestnut like seed, to the fruit, leaves, and even the tasty stem tips too. Like all squash, every single bit of it is useful, and edible. Even the pig adores them, as she crunches them like apples. They do not have a great deal of nutrients, nor do they have a lot of flavor, which brought me to ask, “what do I do with a bushel of them?” When conditions are right, they will produce a lot at once.My method is to harvest, and follow by pruning the vines heavily twice a year. The green material is perfect for adding to your compost, the lush vines help to conserve garden moisture, and they make for a very useful pig food/bedding making for what I call Hannah’s edible bed. The vines will soon produce more than you know what to do with, or at least that is how it was, but now this changes everything.
As I was sorting through vine and pipinola fruit, separating the split sprouting fruits out so to replant, or fed to the pig. The small medium and even larger ones seemed to have untapped potential. An idea popped into my head: could this be fermented? I kicked off the rubber boots and looked it up online. In the Americas, expats often use them for kraut. There were several references to how they are available in Mexico, Central, and South America, by the bag or bushel. Elisa Fusi charmed my idea with this wonderful blog post about her organic farming and cooking while visiting Panama. More and more recipes turned up as I sat by the computer. I was growing excited, and needed to begin. I keep couple cases of jars on hand at all times, because, you just never know when a storm is going to hit and you need to put up a bushel of something.
The recipes varied primarily in the way they let the fermentation take place. Some used jars with lids, some used crocks, one used a bowl covered in plastic wrap. I decided to use the jars, since my counter space is limited, and having them ferment in the jars seemed one step closer to being completed.
Each recipe called for a slightly different amount of salt as well. So here is how I did it:
Washed down counter, cutting board, and selected a knife.
Pulled a box of kosher salt and a large glass bowl out of the cabinet.
Washed jars, and set them aside with new lids
I pulled out the ol’ trusty thrift store Cuisinart, and selected the shred blade, feed tube pusher, and the tool that slides into the shred blade and fits it to the machine. I made a nice work area with several clean dish towels up and out of the way.
I washed and sorted the pipinola/chayote, then quartered or halved them to fit in the food processor feed tube. I left them clean and in two colanders so to keep them close at hand. There is no need to dry them.
Next, I rifled through the spice drawer looking for underutilized, but fresh spices. Several recipes called for caraway seed, which I use in my Irish Beer Bread. I am sitting on a goldmine of fennel seed and lemon grass too. I pulled some garlic too.
Then I started shredding until I filled the whole container. Then emptied it into the glass bowl. I added about 4 teaspoons of salt, to over a quart of shredded squash, a dash of caraway seed, and minced two garlic cloves. I massaged it all together for about 5 minutes. In that time, the pipinola begins to foam and release liquid. I then loaded the soon to be kraut into jars, leaving an inch of room at the top, and pressing the mixture down firmly. Liquid should cover the kraut. The lid is screwed on, and they were placed one after the next onto a shelf out of the sun.
I could have walked away at that point, but instead, I kept going. I had just bought fresh seaweed, and the orange Habanero were producing, and I cannot make anything without pumpkin, I was skidding into a creative buzz. So I kept going, and trying all kinds of made up combinations. I treated each in the same manner, of packing the solids down, and having enough brine to cover them. I backed off on the salt when adding salt-laden seaweed, I pumped up the garlic and chilis to make a sort of “Squash-chi” kraut kimchi combo.
Each day has begun with my taking five minutes to open them all, release any air pressure that built up, and then smoosh down the solid material so to keep it pressed together, and below the brine line. We are now at day 4, and I have already eaten a pint through my daily sampling, so do make plenty. I have just gifted jar today, and I am sure there will be some requests for trades.
I made a trade today, exchanging my pumpkin for zucchini, I thought that that may be nice to use as well. I picked up some Hawaii grown Sweet onions too. So the day is filled with promise for fermentation, since I still have most of the bushel of Chayote still to go. Overall, it was easy, fun, and I felt like it made a great product out of a rather extraordinary harvest.
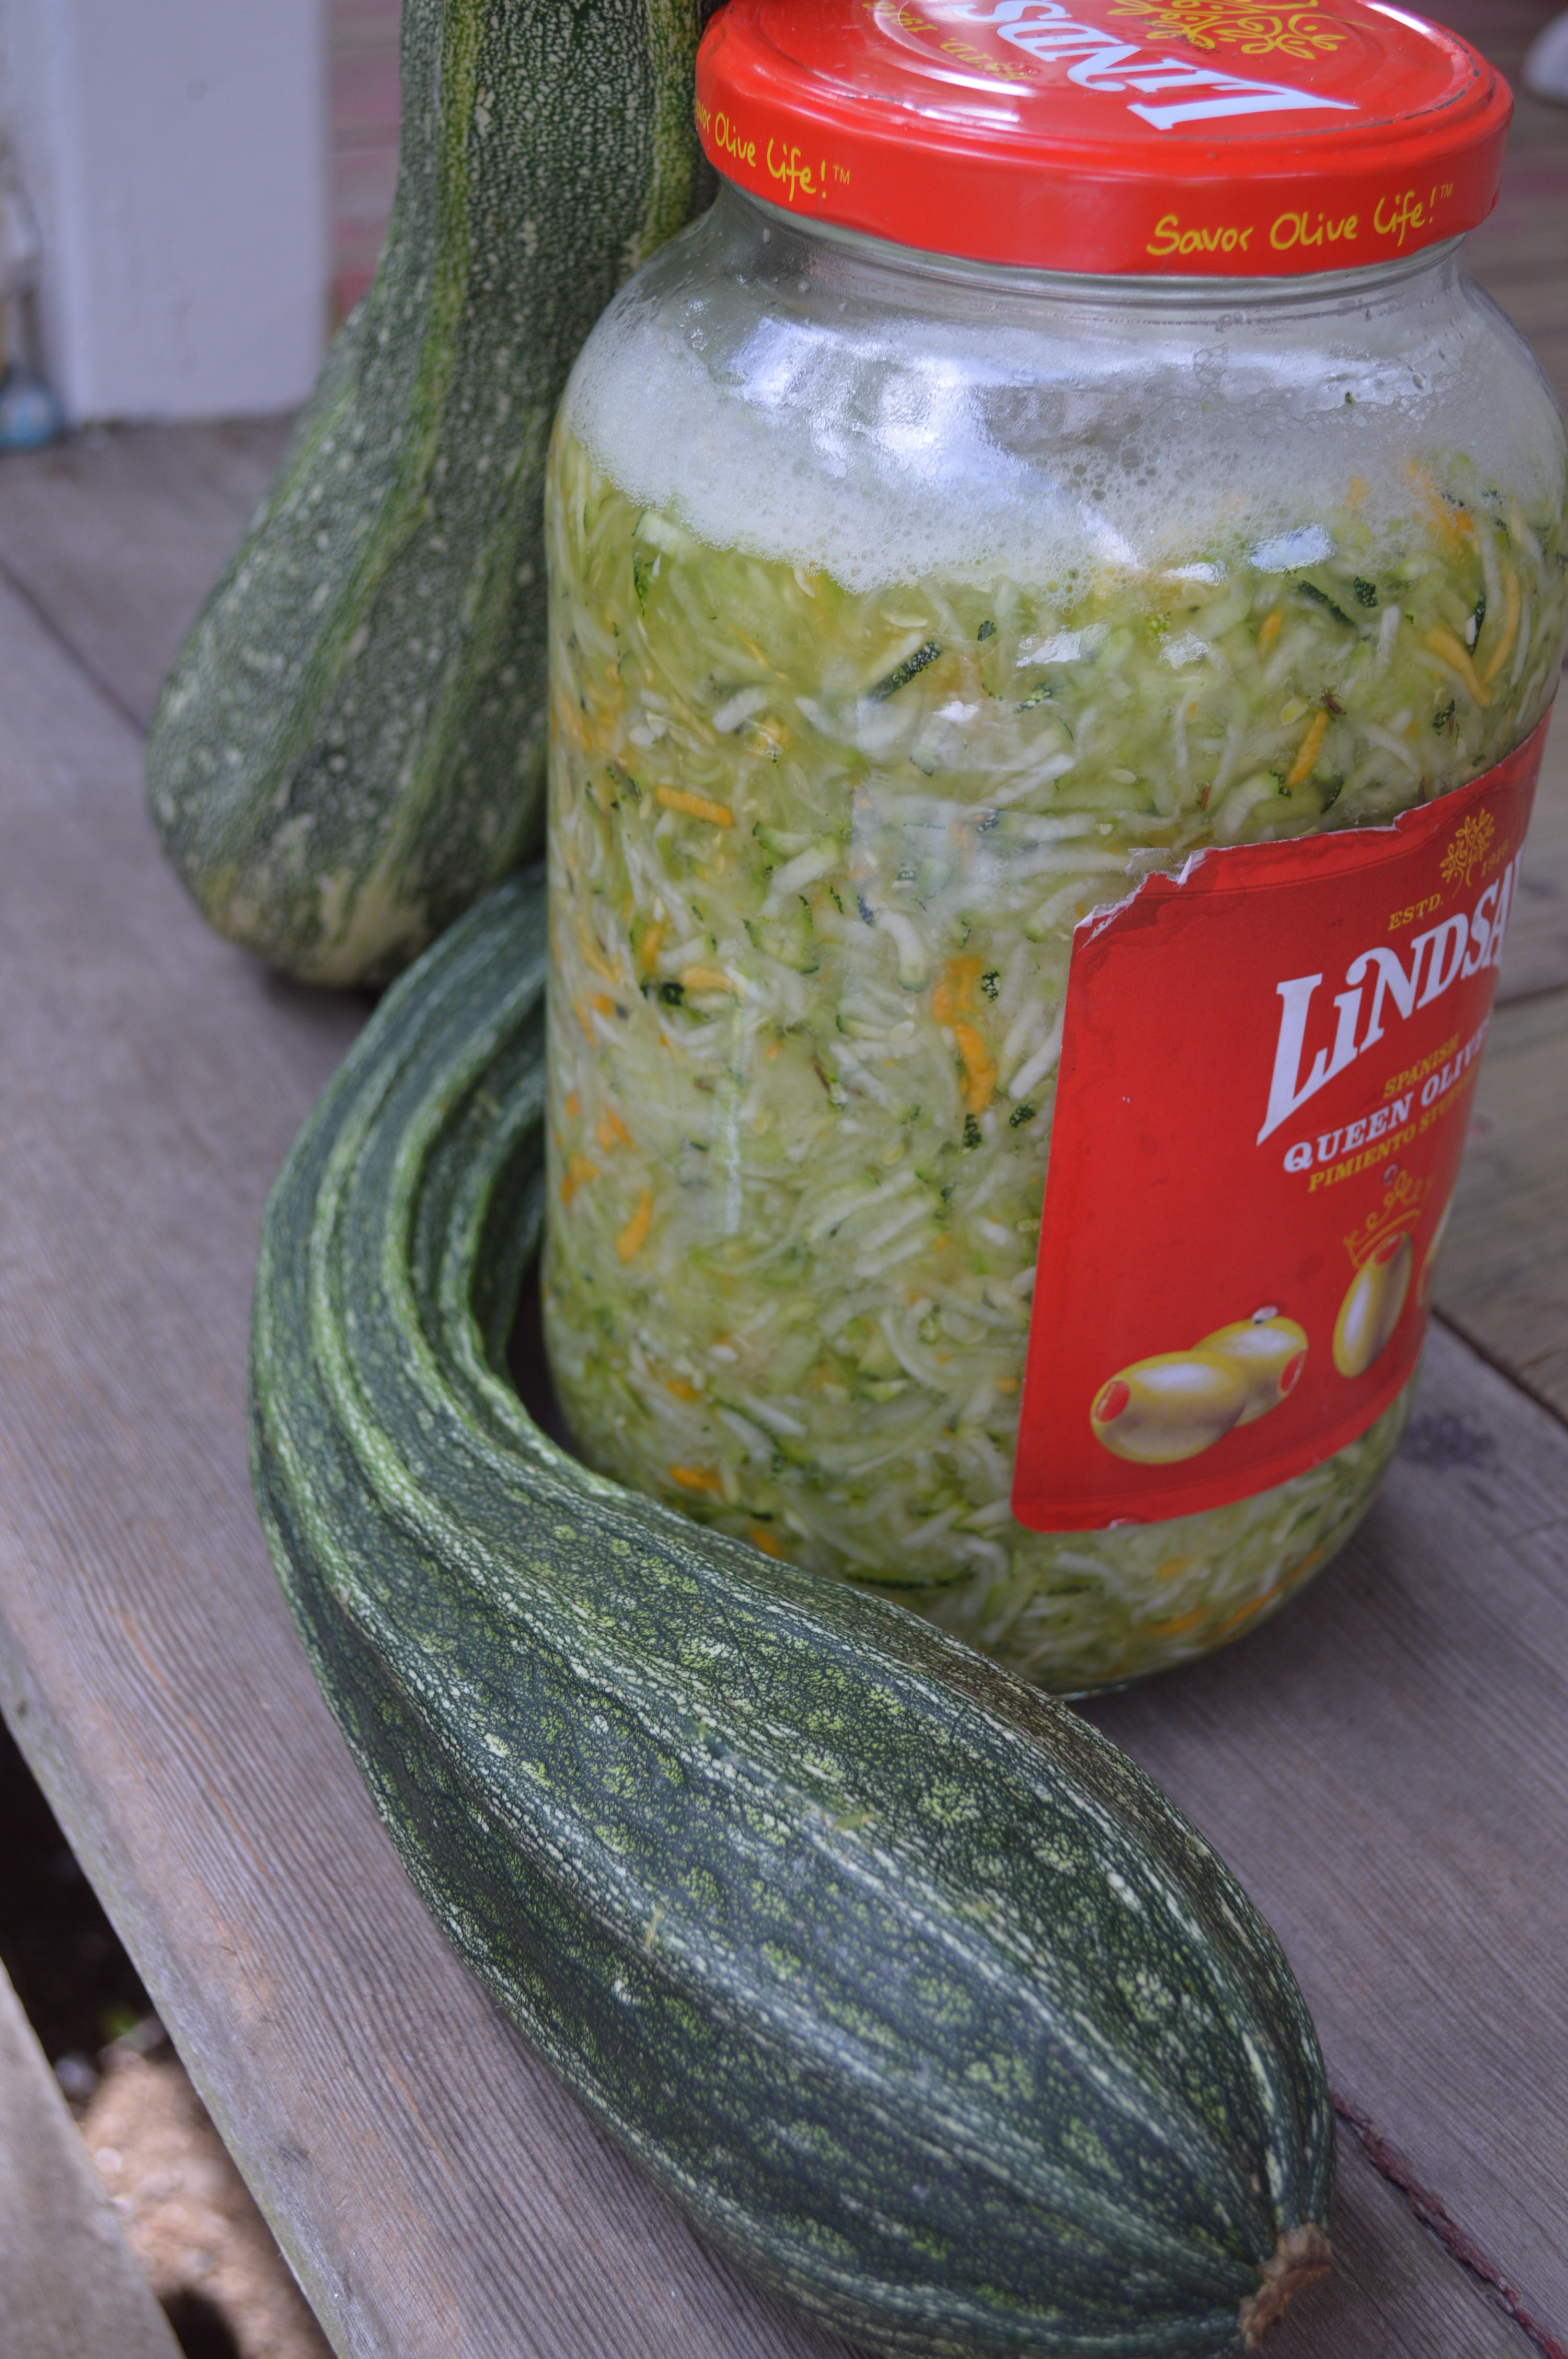
A gallon jar from a restaurant makes the job easy. A trade with another farmer makes my range more interesting. This is 3 squash kraut with sweet onion.
These will all be refrigerated in the next week. They will then keep in the fridge for months.